


Table of Contents
When it comes to construction, concrete is one of the most fundamental materials used. From buildings to bridges, sidewalks to dams, concrete plays a crucial role in creating structures that last for years. But how can we ensure that the concrete we’re using is of high quality and will perform as expected? This is where tests like the concrete slump test come into play.
Concrete slump test can either be carried out in the lab or on site during the progress of work. Concrete slump test is only carried out where the nominal maximum size of aggregate does not exceed 38 mm using slump test apparatus.
Understanding Concrete Slump

Before delving into the test itself, let’s first understand what “slump” means in the context of concrete. The consistency or workability of freshly mixed concrete is referred to as slump. It tells us how easily the concrete can flow and be moulded. Concrete with a high slump is more fluid and easier to work with, while low slump concrete is stiffer and may require more effort to manipulate.
Why Concrete Slump Test?
Due to the faulty batching plant, the proportions or the weight of cement, aggregates, water are not properly maintained as specified in the concrete mix design report. Sometimes worker mix the extra water at site to get the flexibility in on going concrete pouring and it makes the concrete poor. Hence poor knowledge of workers may lead to the poor workability of concrete. In both the case, the improper batching of concrete results into the poor workability of concrete. The concrete slump test is a simple yet effective way to measure the workability of freshly mixed concrete. It helps ensure that the concrete being used is of the right consistency for the specific job at hand. Whether it’s for pouring foundations, forming columns, or creating pavements, having the correct slump ensures that the concrete can be properly placed, compacted, and finished.
To get the durable concrete during the whole construction work, workability of concrete is being measured at regular interval with the help of concrete slump test.
Here we discuss the apparatuses of concrete slump test and slump test procedure.
Slump Test Apparatuses
Performing the concrete slump test requires specific apparatus to accurately measure the concrete’s workability. Here are the essential tools:

Slump Cone: This is a funnel-shaped metal mould made of steel or plastic. It’s open at both ends and has standard dimensions specified by various construction standards. The slump test cone is used to contain the freshly mixed concrete during the test.
| Slump Test Cone (Mould) | Dimensions (cm) |
| Bottom diameter | 20 |
| Top diameter | 10 |
| Height | 30 |
Tamping Rod: Also known as a slump rod or slump stick, this is a straight steel rod with a rounded tip. It’s used to compact the concrete within the slump cone in a standardized manner.
Scoop: A scoop or shovel is used to transfer the concrete from the mixing vessel to the slump cone. It’s important to use a scoop that won’t introduce any additional air or water to the concrete mix.
Straight Edge: This is a flat, straight tool used to remove excess concrete from the top of the slump cone after it’s filled. It ensures a smooth, level surface for accurate measurements.
Scale for Measurement: A good quality scale is used to measure the difference of the slump.
Slump Test Procedure

Now, let’s walk through the steps of performing the concrete slump test:
- Preparation: Gather all the necessary equipment and ensure they are clean and free of any debris.
- Setup: Place the slump cone on a stable, level surface. It’s important to set it up in an area where the test can be conducted without interference.
- Filling the Cone: Fill the slump cone with freshly mixed concrete in three layers, each compacted with a specific number of tamping rod strokes to ensure proper compaction.
- Striking Off Excess: After filling the cone, use a straight edge to remove any excess concrete from the top of the cone, creating a smooth, level surface.
- Removing the Cone: Carefully lift the slump cone vertically, making sure not to disturb the concrete inside. This should be done in a smooth, steady motion to prevent any sudden movements.
- Measuring Slump: Measure the difference in height between the original height of the slump cone and the displaced concrete. This measurement represents the slump of the concrete and is recorded in millimetres (mm).
Interpreting Concrete Slump Results
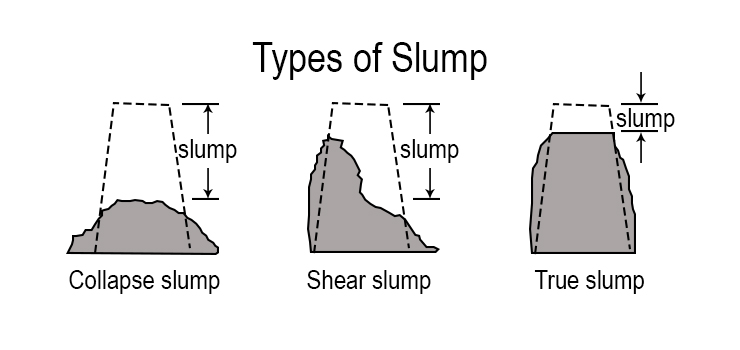
Full Collapse Slump: In Full collapse, the concrete collapse completely. It indicates the higher amount of water is mixed to make the concrete.
Shear Slump: In shear failure, the top portion of concrete slump slips away from side. It indicates fall results and it is necessary to test the concrete again.
True Slump: In true slump, the slump moderately changes its shape. It indicates that the proportion of water cement is as specified in concrete mix design.
Zero Slump: In zero slump, the fresh concrete does not change its shape at the time of concrete testing. It indicates that the small amount of water is used to make the concrete.
| Sr No | Concrete Slump | Degree of Workability (Concrete Workability Ranges) | Use to construct / Placing Conditions |
| 1 | 0 – 25 mm | Very low Workability | Road, PCC, building RCC foundation in water logged area, blinding concrete, shallow sections, pavements using pavers. |
| 2 | 10 – 40 mm | Low Workability | Foundations with light reinforcement, Mass concrete, lightly reinforced sections in slabs, beams, walls, columns, floors, Hand placed pavements, canal lining, strip footings |
| 3 | 50 – 90 mm | Medium Workability | Normal reinforced concrete placed with vibration |
| 4 | 100 mm -120 mm | High Workability | Where reinforcing has tight spacing, and/or the concrete has to flow a great distance (in case of pump Concrete), heavily reinforced sections in slabs, beams, walls, columns, slip form work, pumped concrete |
| 5 | 120 mm – 150 mm | Very High Workability | Trench fill, in-situ piling |
Key Takeaway
In essence, the concrete slump test is a vital quality control measure in the construction industry. By assessing the workability of freshly mixed concrete, it ensures that structures are built to the highest standards of durability and performance. With the right apparatus and understanding of the test procedure, builders, contractors, and engineers can confidently assess and manage the quality of their concrete, contributing to the success and longevity of their projects.
Also Read:
What is Compaction of Concrete?


