
Residential mailbox installation is a rewarding and easy DIY project that can enhance your home’s curb appeal. This article will walk you through each step, providing practical tips and essential information for a successful installation. Whether you’re a homeowner or a DIY enthusiast with little to no prior experience, this easy-to-follow guide will assist you in installing your mailbox confidently.
Tools and Materials Needed
Before you start, gather the necessary tools and materials to ensure a smooth installation process.
Tools

- Post hole digger
- Level
- Shovel
- Tape measure
- Screwdriver
- Drill
- Wrench
- Hammer
Materials

- Mailbox
- Mailbox post
- Fast-setting concrete mix
- Gravel
- Screws and bolts
- House numbers (optional)
- Wood preservative (if using a wooden post)
Choosing the Right Mailbox and Post

Selecting the appropriate mailbox and post is crucial for both functionality and aesthetics. Here are some common types to consider:
Mailbox Types

01. Post-mounted Mailboxes

Classic styles mounted on a post are common in suburban and rural areas, offering a traditional look. They are available in various designs and materials, providing flexibility to match your home’s exterior.
02.Wall-mounted Mailboxes

A wall-mounted mailbox is attached directly to the house, ideal for homes without a front yard. These mailboxes are mounted near the front door and come in various sizes and styles to complement home designs.
03. Mail Slots

Built into the front door, mail slots are suitable for urban settings and allow mail to be delivered directly to the home. They are a secure option, keeping mail safe from theft and weather.
Post Types

01. Wooden Posts

Traditional and easy to customize with paint or stain: Wooden posts offer a rustic look and can be personalized to match your home’s decor. However, they require regular maintenance to prevent rot and insect damage.
02. Metal Posts

Durable and prefinished to resist weathering: Metal posts are low-maintenance and provide a modern look. They are often coated to prevent rust and corrosion, ensuring longevity.
03. Plastic Posts

Lightweight and resistant to rot and corrosion: Plastic posts are easy to install and maintain, making them ideal for various climates. They are available in different styles and colors to suit your preferences.
When making your selection, consider the style of your home and the local climate. Ensure you have a USPS approved mailbox that meets USPS requirements, including the correct size and placement.
Step-by-Step Residential Mailbox Installation Guide
Follow these detailed steps, from preparing the site to the final finishing touches, to ensure a smooth and successful installation.
Preparing the Installation Site
- Select a Location: Choose a spot near the curb that is easily accessible for the mail carrier. Ensure it complies with local regulations and USPS guidelines for distance from the road.
- Check for Utilities: Before digging, contact your local utility companies to ensure you don’t hit any underground lines. This step is crucial for safety and compliance with local regulations.
- Measure and Mark: Measure the desired height of the mailbox post (usually 42-48 inches from the ground) and mark the spot for the post hole. Use stakes or spray paint to mark the exact location and dimensions.
Setting the Mailbox Post
- Dig the Hole: Use a post-hole digger to create a hole approximately 2 feet deep and 6-8 inches in diameter. Ensure the hole is deep enough to stabilize the post and prevent it from tipping.
- Add Gravel: Place a few inches of gravel at the bottom of the hole for drainage. This helps prevent water from accumulating around the base of the post and extends its lifespan.
- Insert the Post: Position the post in the hole, ensuring it is level. Use a level to check the vertical and horizontal alignment, and have a helper hold the post steady if necessary.
- Add Concrete: Pour fast-setting concrete mix around the post, filling the hole about 2-3 inches below ground level. Add water according to the concrete mix instructions, and stir the mix using a stick or shovel to ensure it fills all gaps.
- Level and Secure: Use a level to ensure the post is in place until the concrete sets, which usually takes about 20-30 minutes. You can use temporary support to keep it steady during this time.
Attaching the Mailbox
- Prepare the Mailbox: Follow the manufacturer’s instructions to assemble the mailbox and prepare it for installation. Check all components for defects or missing parts.
- Attach to Post: Use screws or bolts to attach the mailbox to the post. Ensure it is securely fastened and leveled. A drill or screwdriver can be used to tighten all fasteners.
- Adjust Height: Verify the height from the ground to the bottom of the mailbox to ensure it meets USPS guidelines (typically 41-45 inches). Make any necessary adjustments for compliance.
Final Adjustments and Finishing Touches
- Add House Numbers: Attach house numbers to the mailbox or post for easy identification. They should be visible from the street and use weather-resistant materials for longevity.
- Paint or Stain: If you have a wooden post, apply a wood preservative, paint, or stain to protect it from the elements. Choose a finish that complements your home’s exterior and allows sufficient drying time.
- Check Stability: Ensure the mailbox is stable and secure. Apply gentle pressure in various directions to test stability and tighten any loose screws or bolts as necessary.
Tips for Ensuring Compliance with USPS Requirements

Ensuring your mailbox complies with USPS requirements is crucial for seamless mail delivery and adherence to regulations. Here are detailed tips to help you meet these standards:
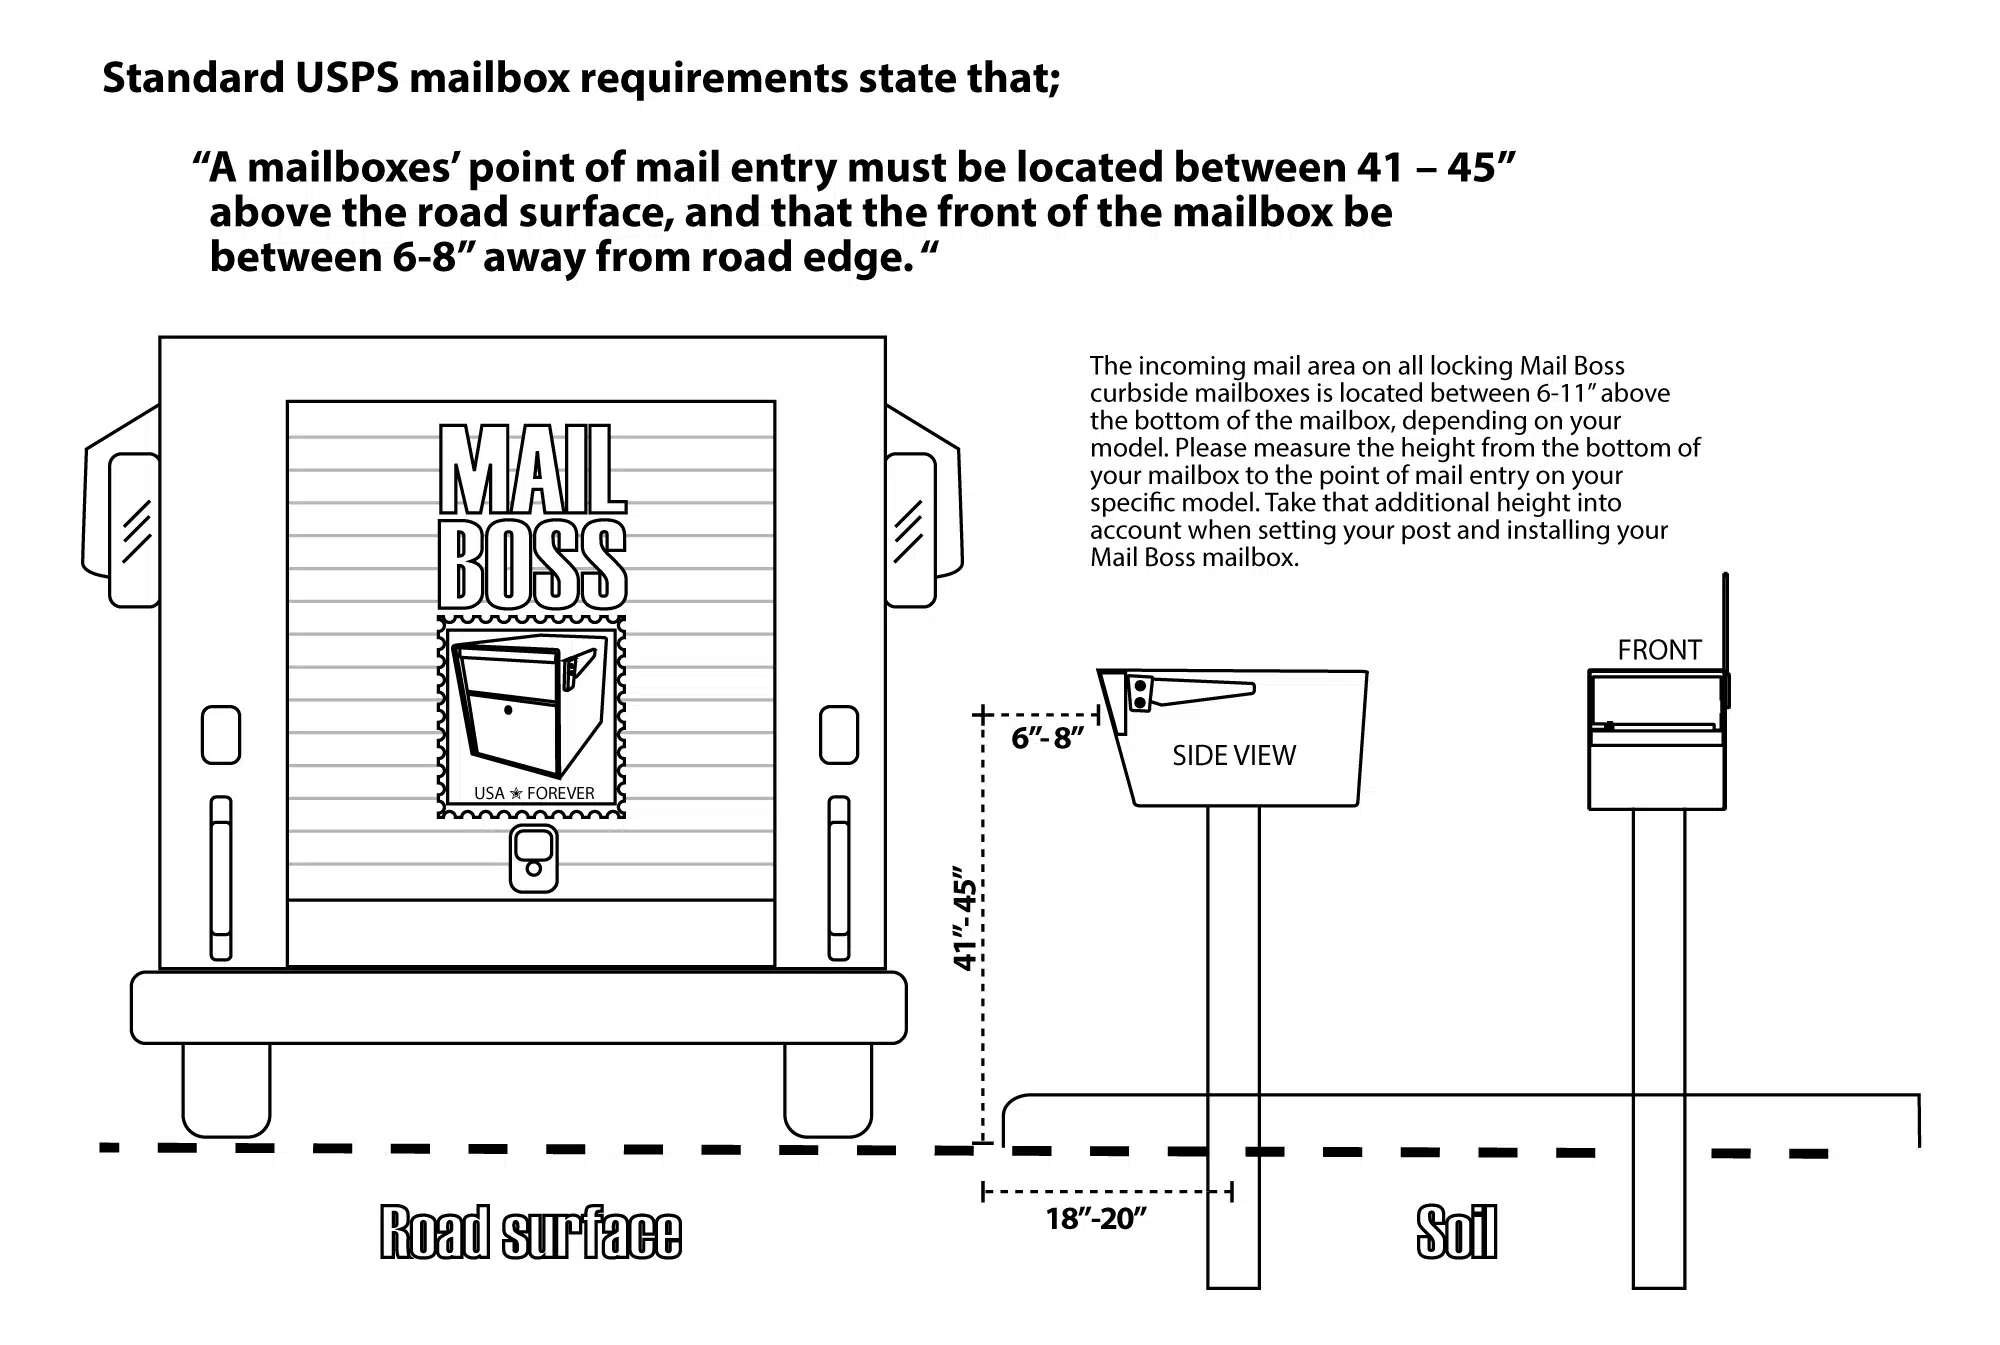
- Mailbox Height: Ensure the mailbox is 41-45 inches from the ground to the bottom of the mailbox. This height is designed for easy access by the mail carrier without leaving their vehicle.
- Setback from Curb: Position the front of the mailbox 6-8 inches back from the curb. This placement ensures the mailbox is reachable for the mail carrier and out of the way of passing vehicles.
- Visibility: Make sure house numbers are visible on the mailbox or post. Use reflective or contrasting materials for the numbers to ensure they can be easily seen day and night.
- Accessibility: Ensure the mailbox is easily accessible for the mail carrier without any obstacles. Trim any nearby bushes or branches that might block access, and keep the area around the mailbox clear of snow and debris.
Conclusion
Residential mailbox installation is a simple yet rewarding DIY project that enhances your home’s curb appeal and functionality. This comprehensive guide will ensure a successful installation that complies with USPS requirements. These instructions will help you improve your home’s exterior and guarantee your mailbox serves its purpose for years. Happy installing!
Also Read : Blending Style and Utility in Modern Mailbox Design
Image Courtesy : Image 13


