Modern homes have eliminated traditional pelmets for their curtains, but no one can deny the fact that pelmets add to the visual quotient of a room. Does this spark your interest in installing a box pelmet? Then read on to learn the nitty-gritty of the DIY box pelmet.
What is a Pelmet?

According to the Collins dictionary, a pelmet is a framework placed above a window, used for decoration or to hide curtain fixtures. It is similar in appearance to a valance, which performs the same function but is made of fabric. One can make a pelmet with plywood and paint it or cover it with fabric.
Benefits of Pelmets
Pelmets serve multiple purposes besides adding to the aesthetic value of a room. The benefits of pelmets are as follows:
- They conceal curtain hardware like rods or fixtures that are part-and-parcel of your window design, thereby lending a clean and clutter-free look to your windows.
- They block excess light from seeping into your room, which lends a soft and soothing ambience to the room they adorn.
To know more details about window pelmet, please refer the following article:
DIY Box Pelmet: Step-by-Step Process
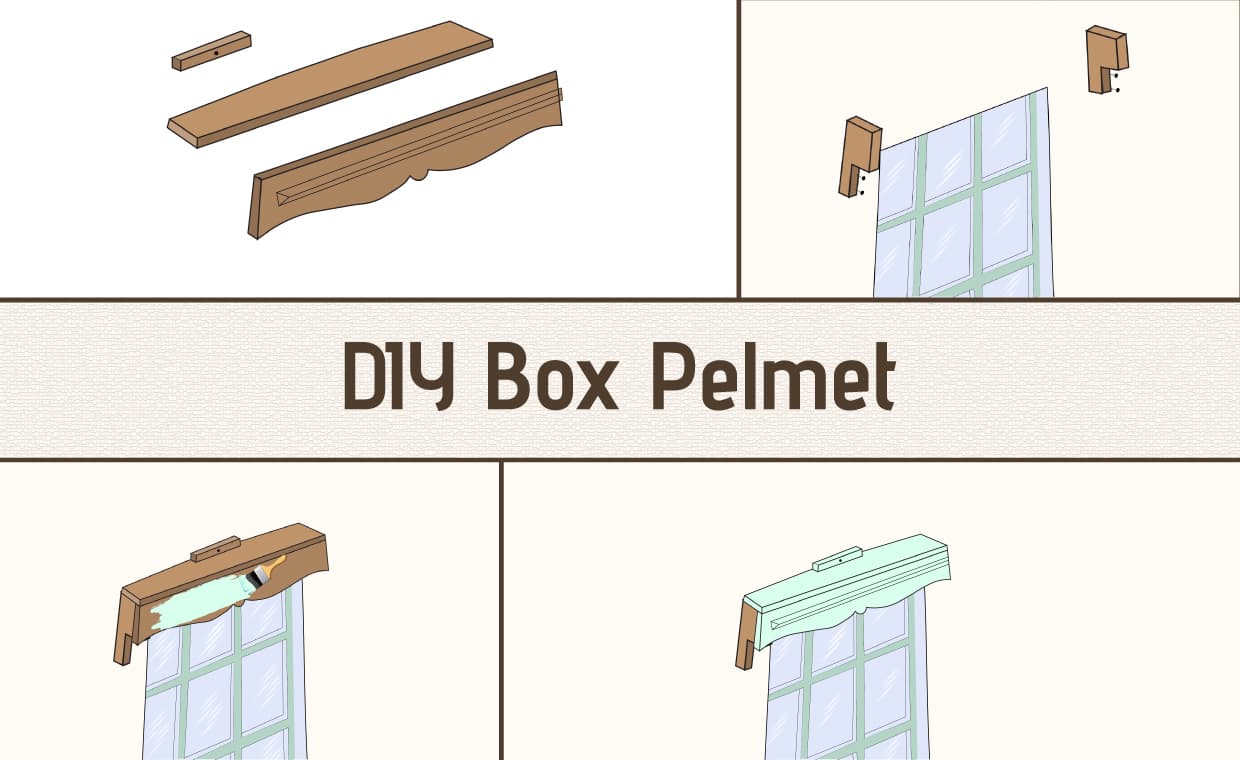
It is possible to completely transform a window and curtain arrangement by simply fitting a pelmet. A decorative front and customised wall brackets are easy to make from timber stock. Using solid timber may mean that more support is needed, but you can then pin to the front interchangeable seasonal arrangements, such as dried lavender.

- Brush and Varnish
- Decorator’s Filler
- Drill/Drill Bits
- Glasspaper
- Glue
- Jigsaw/Planer
- Measuring Tape
- Moulding Pins
- Number 8 Screws and Wall Plugs
- Panel Pins
- Wood for Pelmet
01. Measuring and Cutting


- Measure the width of your window and the drawn curtain positions, then check to see if you have enough space to allow you to fit into the frame surround or whether you need to drill into the wall. In either case, the made-up brackets should be positioned to allow an overhang at each end of 2.5 cm.
- Two fixed brackets support the pelmet that you want to conceal and fasten to the wall in the top dead centre. However, they are not permanently fastened. This eliminates the need to remove bracket screws, which are neatly hidden inside the pelmet, and makes pelmet removal simple. For example, when painting a frame, just remove one screw and lift it down. It’s a challenging task that requires small hands and a stubby screwdriver.
- The cut bracket must fit exactly inside the internal right angle of the pelmet. For example, if the pelmet is cut from 10 cm X 2.5 cm of nominal size wood and planed to a finished size of 9.5 cm X 1.8 cm, the internal dimension is 7.5 cm. Cut the bracket to this size at the top and part of one side, forming the support, then cut back to form a rebate.
- A section of wood 1.8 cm wide and deep and 12 cm long should be left, and this takes the wall screws. Shape the bottom edge of the pelmet into a design of your choice with a jigsaw. Glue and screw a timber support, 2.5 cm X 2.5 cm X 10 cm with a centred fixing hole onto the top centre of the pelmet so that you can screw through into the wall.
02. Joining Together and Fixing Box Pelmet

Make a box pelmet by gluing the top to the front, and pinning with 3.8 cm panel pins. On the front face, directly butting the join of top and front, pin a decorative strip moulding, using 1.8 cm moulding pins, which disguises the butt join. Now, attach the wall brackets, using a suitable length number 8 such as 3.2 cm if you are fixing to the wood surround, or a countersunk 5.7 cm number 8 screw into a wall plug if you are driving into the wall. Position the pelmet, equalise the side overhangs, then fix the top centre support to the wall, again countersinking a 5.7 cm number 8 screw into a wall plug.
03. Finishing Box Pelmet
Fill the screw holes and sand the surfaces smooth. Again, select suitable filler; decorator’s fillers are fine if the surface is to be painted, but a matching wood-coloured stopper is needed if the wood grain is going to be visible under a varnish, as this will tend to ‘disappear’.
Clear or coloured varnishes will certainly look good on the pelmet, but you could also consider painting the brackets to complement the wall colour, blend in with the wall decoration, or match exactly the wood surround. In this way, the brackets are disguised slightly, and full prominence is given to the wood finish on the pelmet that will support your choice of seasonal floral decoration.
04. Attaching the Box Pelmet


- Position the pelmet on its brackets, screw it to the wall through the top batten and varnish.
- The finished pelmet is designed to accept seasonal floral decorations pinned to the front.
Points to Note
- A pelmet comprises – a top and front with decorative moulding and a short fixing batten.

- The upside-down L-shaped brackets take the weight of the pelmet and are screwed to the wall on each side of the window opening.
- Using seasonal flowers and foliage to decorate a window opening provides a means of extending the garden into the house, blurring the distinction between the two areas.
Agreed that there’s a lot of thought and focus involved in installing DIY curtain pelmet box but trust us the final outcome is definitely worth all the trouble!
And before you leave, don’t forget to read the following article:
DIY Curtain Wooden Pelmet Ideas to Enhance Your Interiors
Image Courtesy: Image 3, Image 6
Author Bio
Huta Raval – An English Literature and Journalism Topper, Huta Raval has graduated from the L D Arts College, Ahmedabad. Post serving for 23 years in the NBFC and Public Library Sectors her desire for ‘writing the unwritten’ brought her to the creative field of content writing. Her clientele comprises of NGOs, Blogging Platforms, Newspapers, Academic Institutions, et al.


