


Table of Contents
Quick Summary
- A chain link fence ensures home safety and marks property boundaries.
- It is made of galvanized or steel wire in a zig-zag pattern.
- Also known as wire mesh or cyclone fence.
- The fence is used for both residential and commercial properties.
- Offers strength, visibility, and cost-effectiveness.
- The Fence can be installed quickly and is easy to maintain or repair.
- A chain link fence provides security but it lacks privacy.
- It is available in various materials, sizes, and colours.
- Installation process involves several steps like post setting, rail fixing, and fabric stretching.
- Requires basic tools like pliers, a level, and a post hole digger.
- The cost depends on the length, height, materials, and labour.
- Modern coatings like vinyl and plastic increase fence durability and reduce maintenance.
- The fence option is ideal for both temporary and permanent boundary marking solutions.
A chain link fence is a safety arrangement of a property.The safety of our homes is our utmost priority. Most of us consider the safety of homes as an oasis of comfort and peace. Fencing our homes can ensure us the same. Properly designed and constructed fence protects our site from uninvited visitors, restricts the entry of stray animals, complements the architecture of the building and beautifies the surrounding. Fences serve many purposes throughout the home, both aesthetic and practical: they help in determining a boundary, protect our pets, shield our gardens or can help building a playground within the premises.
Fencing gives a sense of privacy, enhances beauty, and protects individual homes and land. The height and design regulations of fence ensure the safety of the community. Fencing can be done with various materials. Thus, various types of fences are available e.g. – wood fences, bamboo fences, brick wall fences, precast concrete fences, Chain Link fences, aluminium fences, barbed wire fences, etc.
Here, Gharpedia is particularly going to discuss in detail about the chain-link fence.
What is Chain-link Fence?
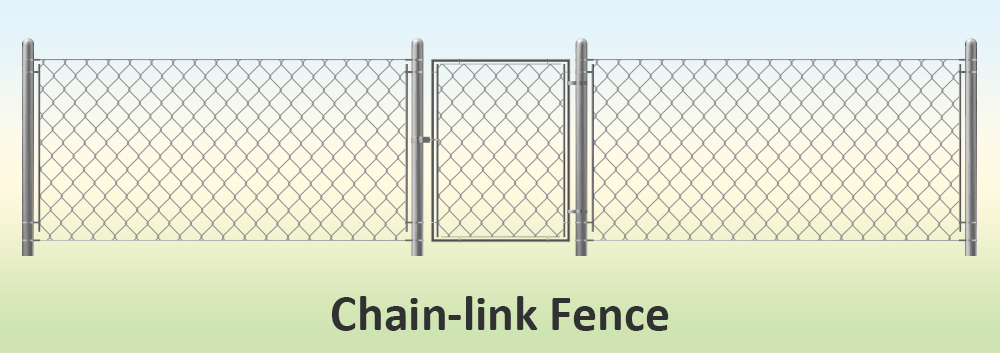
A chain-link fence is a type of fence made of galvanized or steel wire and has a zig-zag pattern of wires. Chain-link fence is also known as a chain wire fence, wire mesh fence, rhombic mesh fence.
Amongst all, the Chain Link fence is one of the most common metal fences preferred widely. It consists of posts, rails, fittings and related hardware creating a framework which in turn supports a Chain Link mesh that is stretched and attached to it. Each of the components in Chain Link fence comes in a different range of weight, thickness and coating that can meet the requirements and address a variety of specification.
Chain-link fences are available in various materials, sizes and appearance options. They are suitable for both residential and commercial purposes. This type of fence is also a befitting option for temporary fencing and can be used for restricting access to an area for specified period.
Advantages of Chain-link Fence
01) Cost Effectiveness of Chain-link Fence:
One of the major reasons of most homeowners favoring chain link fences is its cost-effectiveness. Fences of these types are considerably cheaper than other fence solutions available because they provide parallel services in terms of strength and visibility. If you are working with a tight budget, the chain link fence is more economical compared to the other fence choices and yet as strong and efficient as any other fence.
02) Chain-link Fence Provides Security:
The chain-link fence is made up of secure coated and interlocked steel wires. Thus, it can shield objects within the boundary of the house in cyclones or hurricanes. It is therefore also known as a cyclone fence or a hurricane fence. Due to its degree of protection, it is ideal for a wide range of applications at home and in other areas. This fence can be installed more than 12 feet in height for extra security.
03) Durability of Chain-link Fence:
Chain link fencing is ‘all time’ fencing choice. Its key benefit is that it can be made from a wide range of materials and these materials provide a wide range of durability.
04) Chain-link Fence Comes with a Variety of Design Options:
Various design options in terms of color, size and material are available in chain link fencing. It all depends on your preferences and the type of estate you want to fence. Fencing materials may be produced to a specific thickness and style. If you have limited space, this fence is a solution.
05) Ease of Maintenance and Repair of Chain-link Fence:
This kind of fence is easy to maintain and fix. In case of damage for any reason, this fence can be quickly cut and replaced.
06) Quick Installation of Chain-link Fence:
Chain link fences can be quickly installed compared to other fence options. This job can be accomplished on time if you hire a professional fencing installer.
Disadvantages of Chain-link Fence
01) Chain-link Fences Do Not Provide Privacy:
This kind of fence does not provide privacy. However, in many instances, Chain Link fence repair company installs slates on this form of fence that can help you improve privacy. You may also grow thick vegetation along to get privacy.
How to install Chain-link Fence?
Before building a chain link fence, it is essential to know what kind of materials and tools are required for it. Let us understand about them.
Materials Required For Chain-link Fence Installation
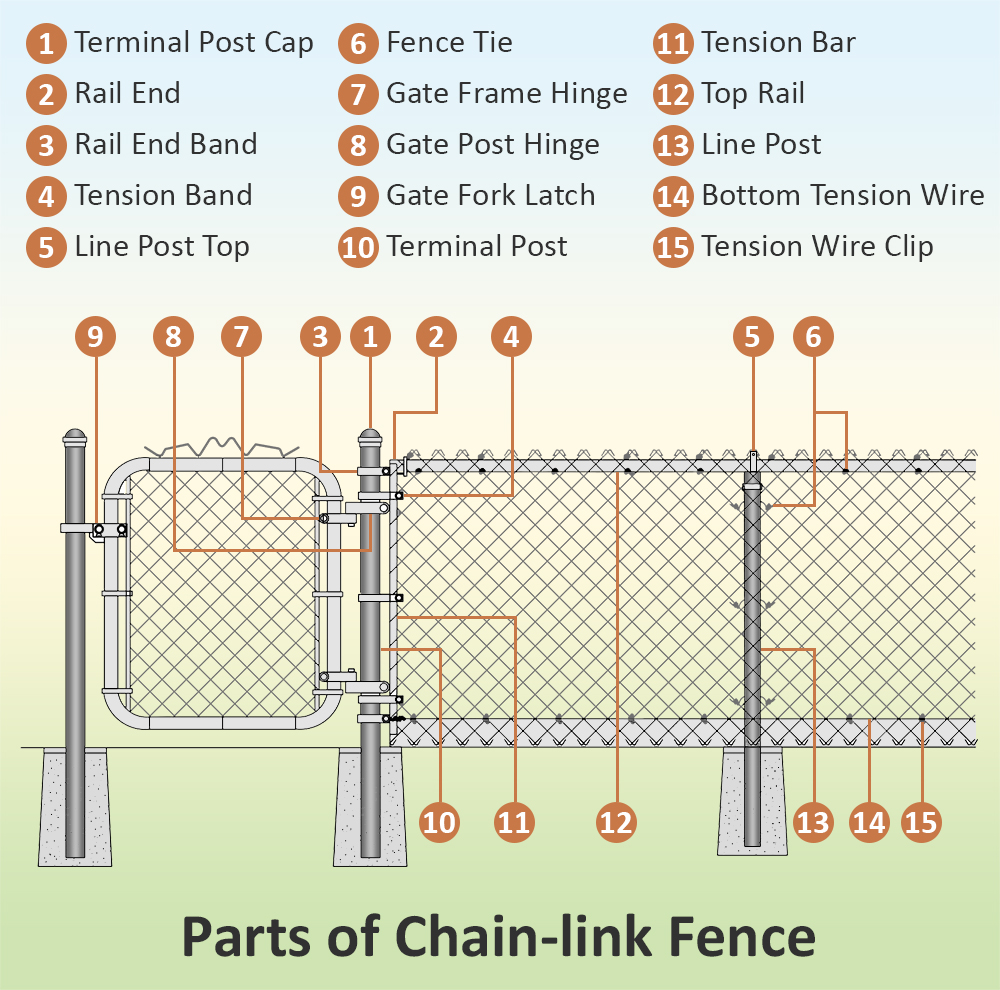
The different materials required for residential chain link fence installation are,
- Chain Link Fabric
- Line post
- Terminal Post
- Tension Bar
- Brace Band
- Rail Ends
- Top Rail Swedged End
- Tension Band
- Carriage Bolts
- Terminal Post Cap
- Loop Caps Match to Post and Rail
- Alum Hook Ties
- Male Hinge
- Female Hinge
- Fork Latch
- Single or Double Swing Gate
Tools Required To Install Chain Link Fence
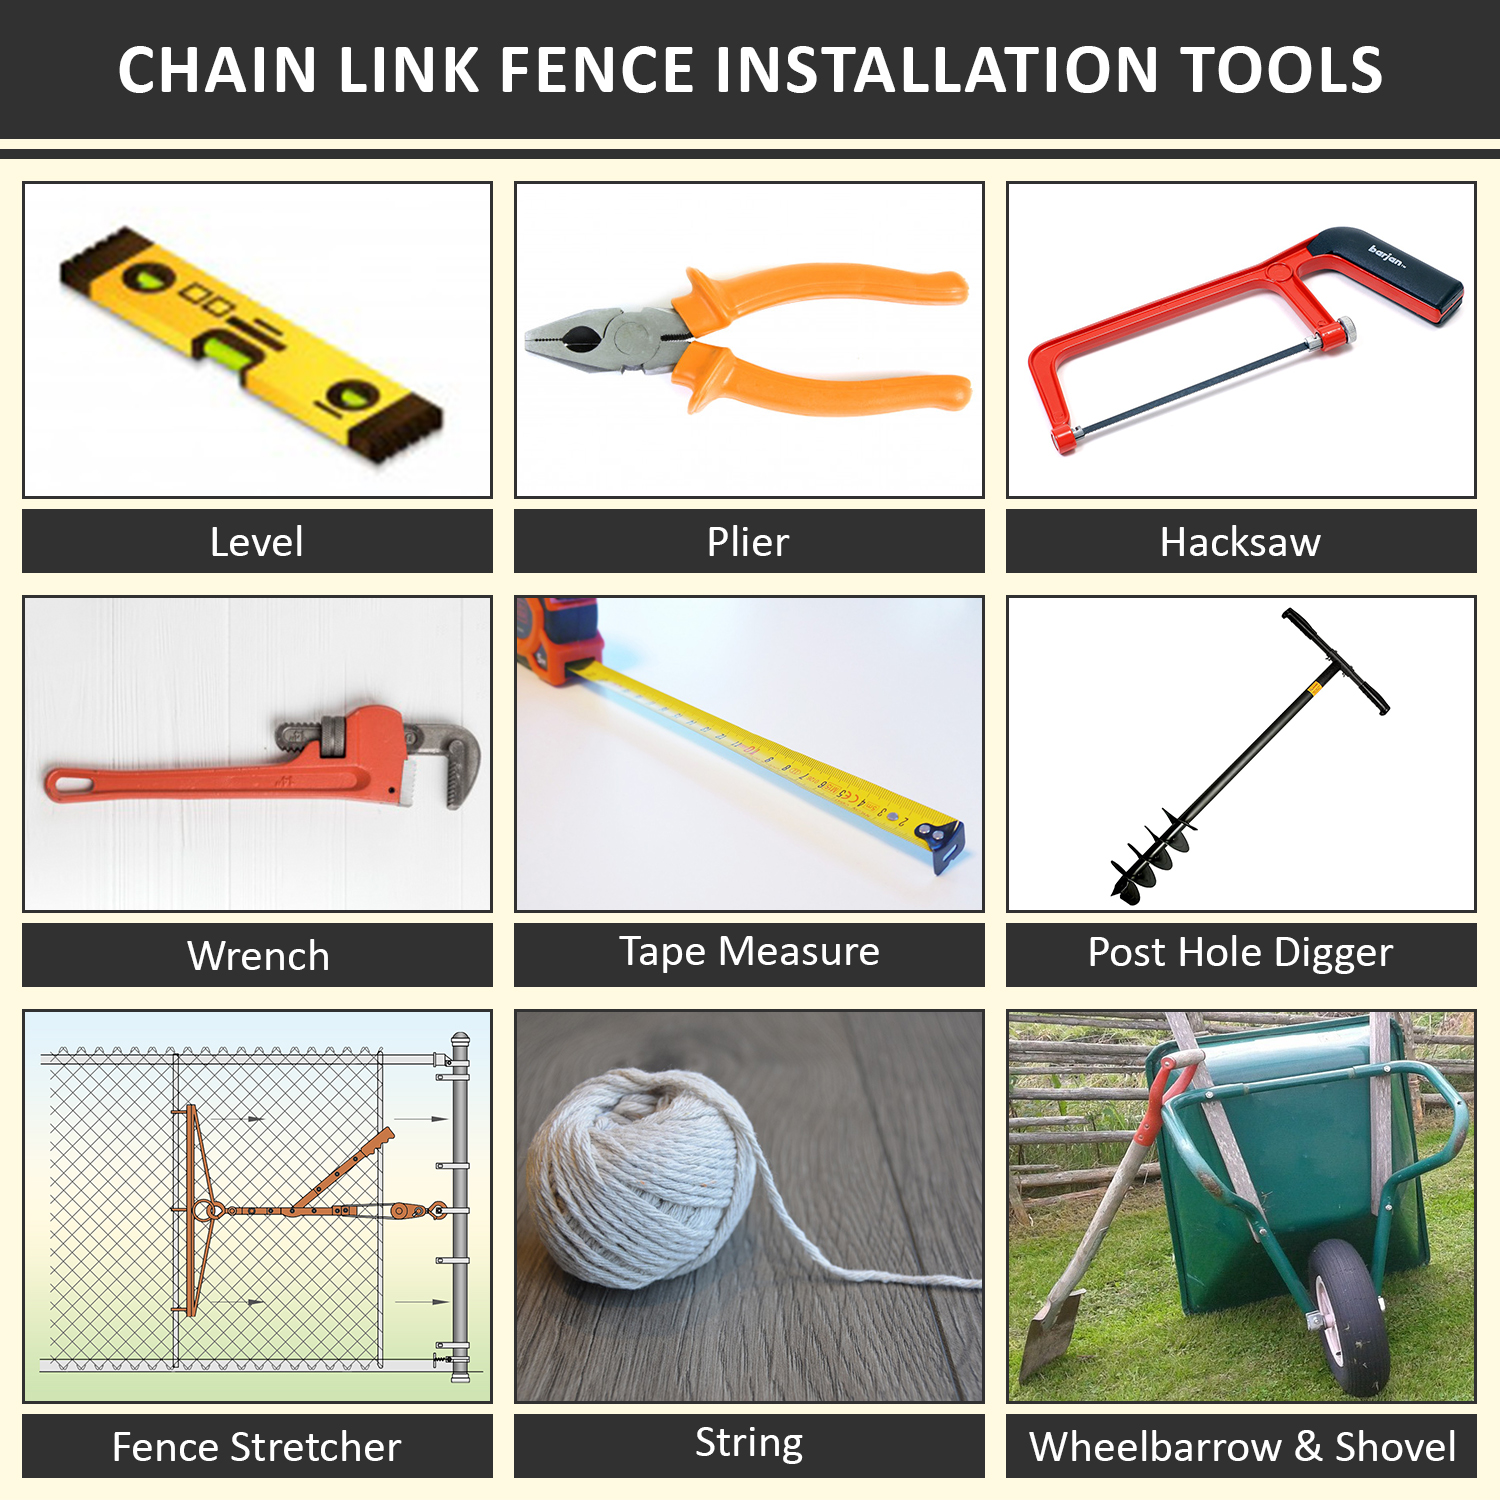
The tools you will find useful in installing your fence are,
01. Level
02. Pliers
03. Wrench
04. Tape Measure
05. Fence Stretcher
06. Post Hole Digger
07. Hacksaw or Pipe Cutter
08. String and Stakes or Mason’s Line
09. Wheelbarrow, Shovel and Hoe for Mix and Transport Concrete
Steps for chain-link Fence Installation
Step 1 – Prepare Chain-link Fence Layout
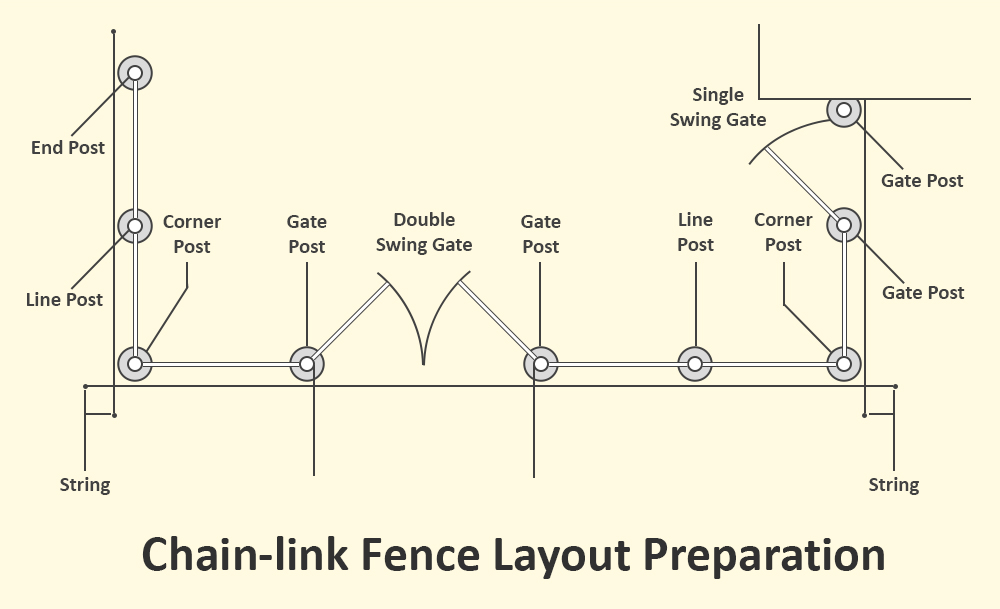
- Locate and establish the boundary lines of your land. According to ‘Rocky Cianchette’ (Owner of MAIN LINE FENCE – DEFINING QUALITY SINCE 1948), it is recommended that all posts be placed approximately 4 inch (10 cm) inside the property line so that concrete footings should not encroach on any adjacent property.
- Measure the total length of your proposed fence. This will help you in deciding how many feet of chain link and top rail would be required for fencing.
- Mark the position of each terminal post (corner, end and gate posts are called terminal posts) with a stake.
- While deciding the locations of the gate posts, note that the clearance for the hinges, latches, etc. is included in the opening width of the gate. Therefore, if you purchase 36 inches opening, the post spacing should be exactly 36 inches, inside post face to inside post face.
Step 2 –Terminal Posts Setting
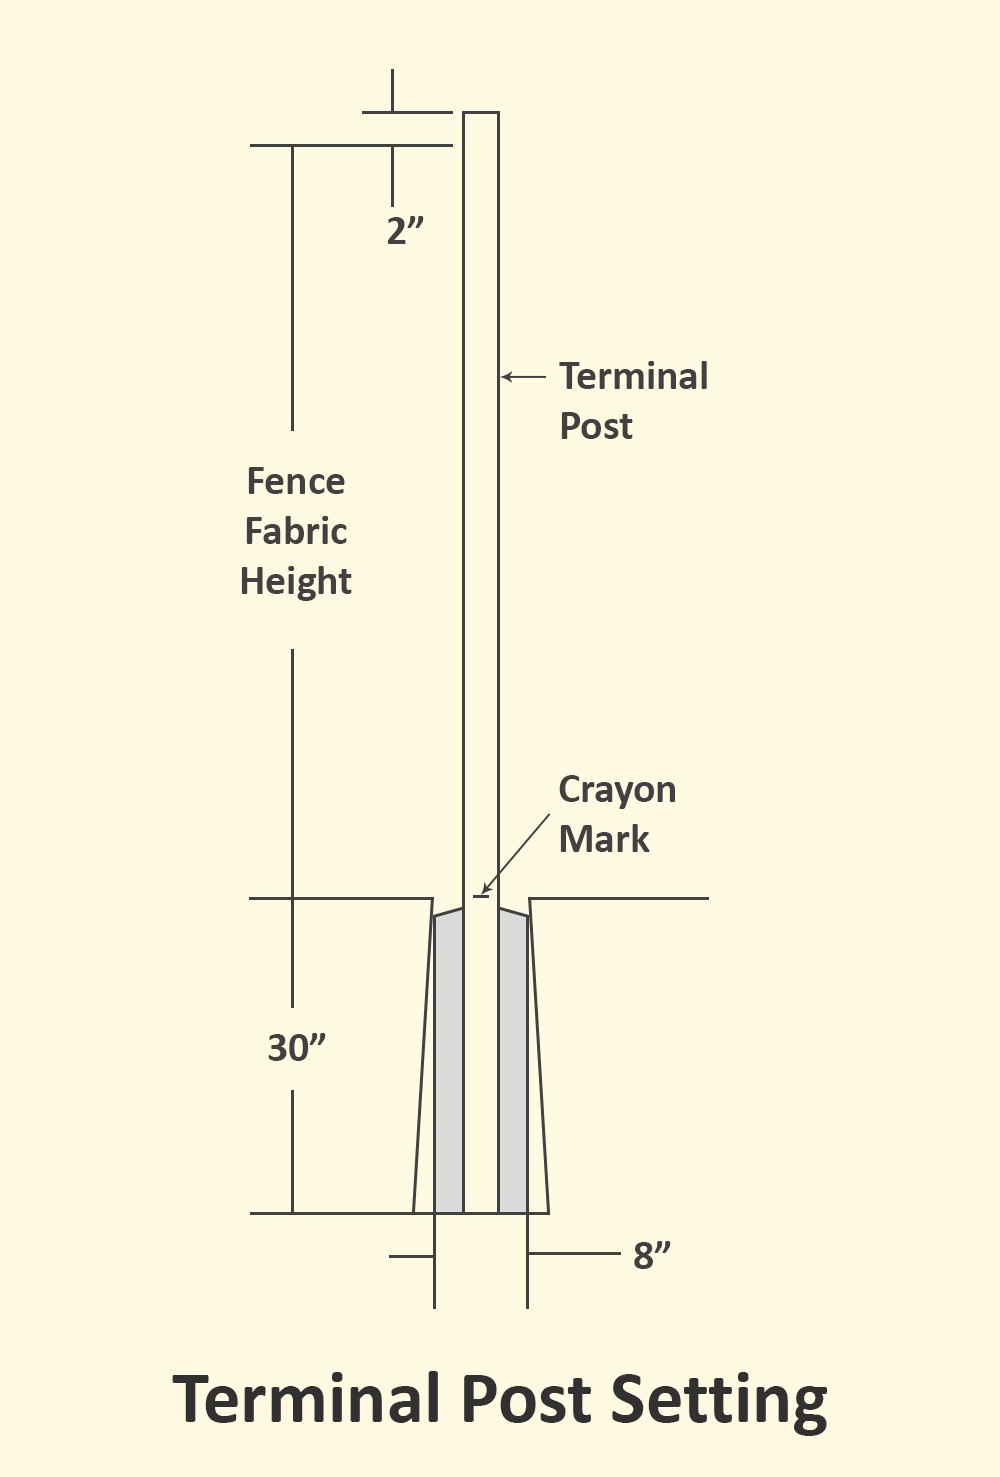
- Dig terminal holes which are approx. 8 inch in diameter and 30 inch deep with sloping sides. However, the exact depth and diameter will be determined depending upon the local weather conditions and soil conditions.
- Mark the ground line on the posts with crayon or chalk. Height above the ground level of terminal posts equals the height of the fence fabric plus 2 inch (50 cm).
- Center the terminal posts in the holes. Make sure the posts are in plumb and placed to the correct height. Cover the posts by constantly pouring concrete. Now, finish with trowel around the posts and pour water.
Step 3 – Locating and Setting Line Posts
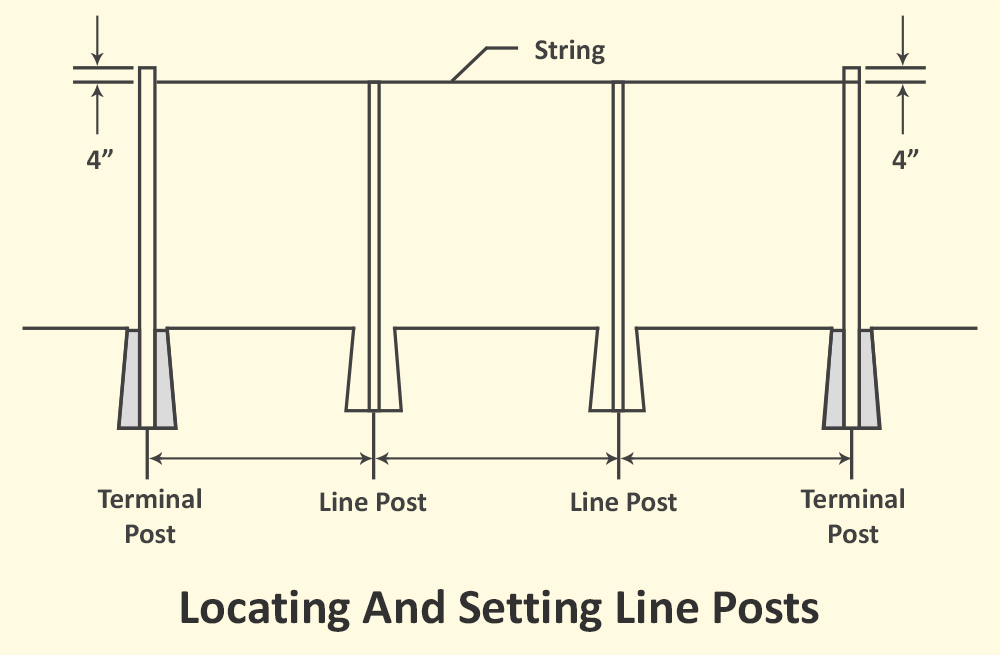
- When the footings of terminal posts have hardened enough to stabilize the posts, extend a string line between terminal posts. The string should be placed on the outer side of the posts 4 inches (10 cm) below the top. Height above level ground of line posts will equal the height of the fabric minus 2 inches (50 cm).
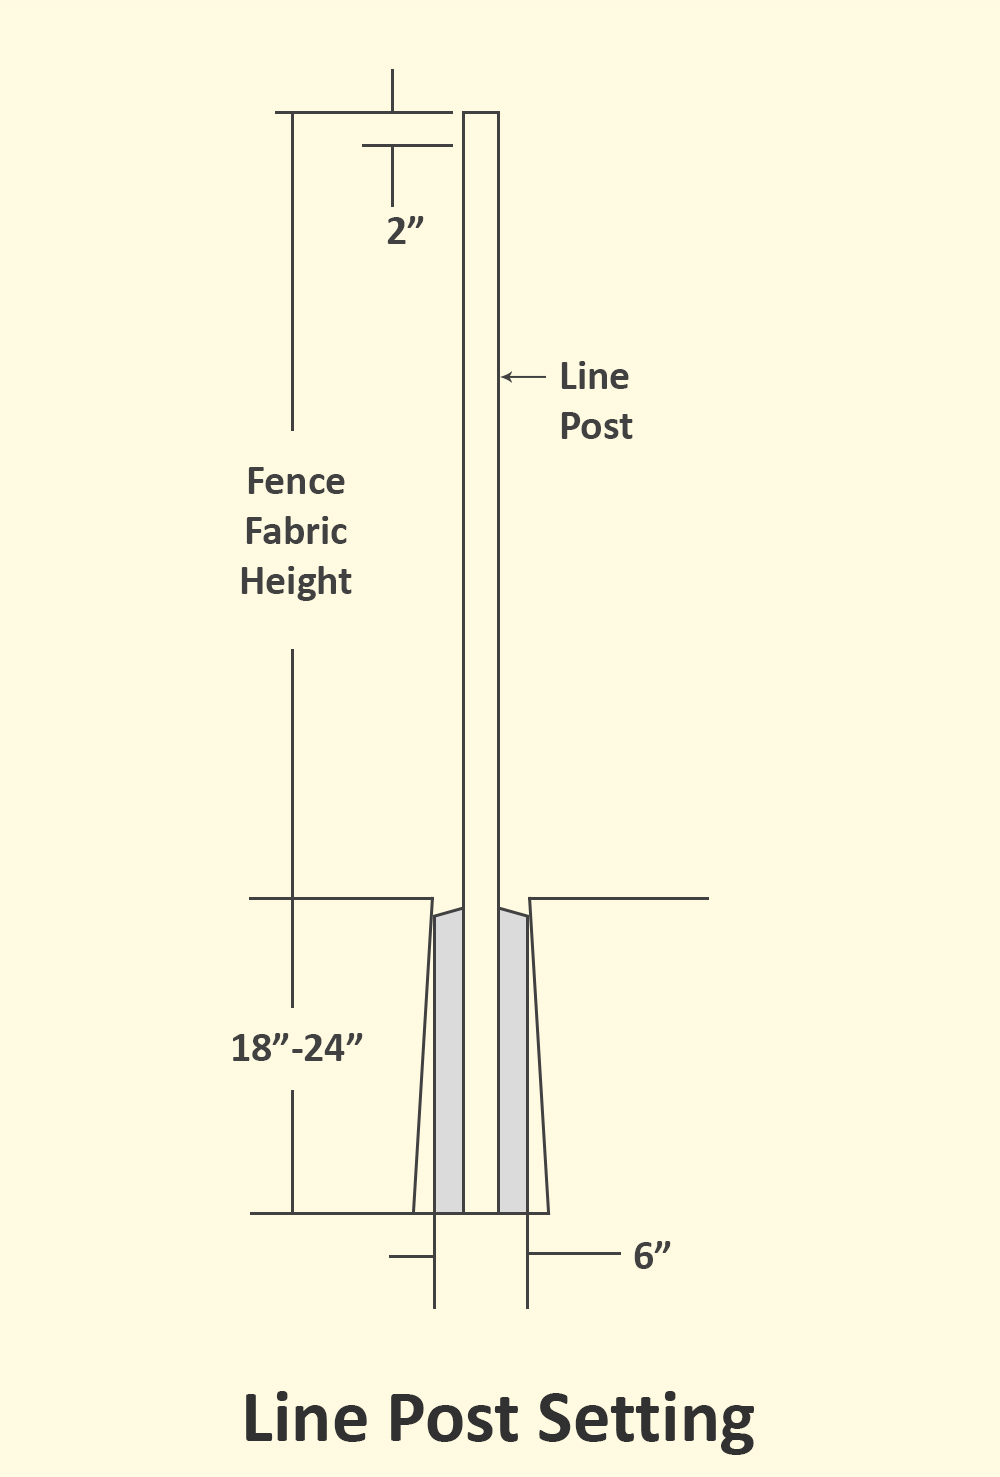
- Measure the distance between the terminal posts and refer to the Post Spacing Map to assess the distance between line posts. Dig line posts holes 6 inches wide and 18 inches to 24 inches deep and with sloping sides (150mm x 150 mm x 450-600mm).
- Centre the line posts in the holes. Make sure the posts are in plumb, aligned with the centres of the terminal posts, and set at the accurate height. Cover the posts by constantly pouring concrete. Finish with trowel around the posts and pour water.
Step 4 – Adding Fittings To Terminal Posts
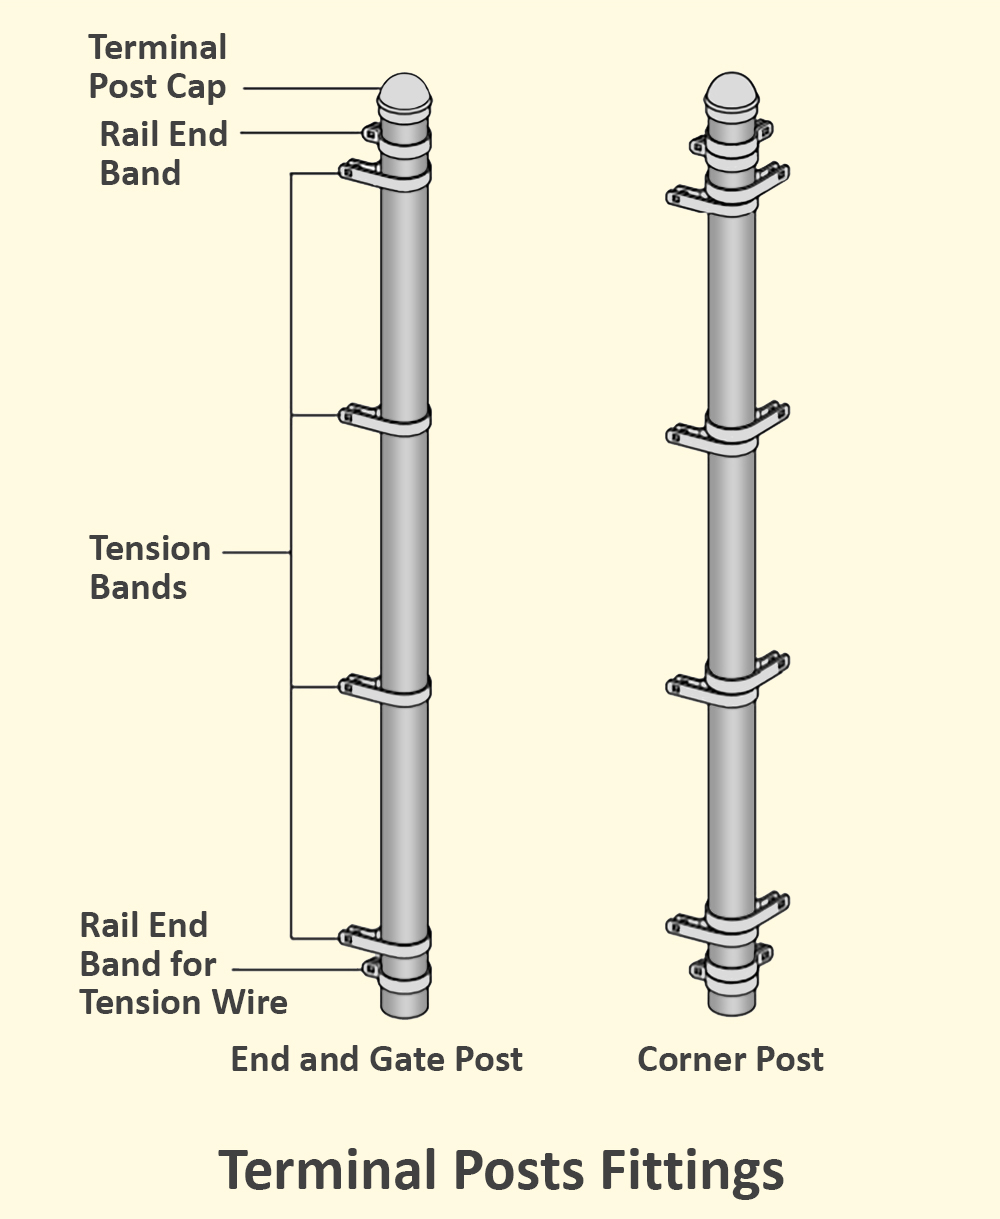
- After the concrete footings have been properly hardened, the rail end bands and the tension bands are slipped onto the terminal posts. (Refer the list of parts for the description and quantity of fittings required for different post styles and heights.)
- The long flat surface of the tension band should face outer side of the fence. Later, apply all the terminal post caps. At this stage, be careful not to spread or distort the fittings.
Step 5 – Installing Top Rails on Line Post
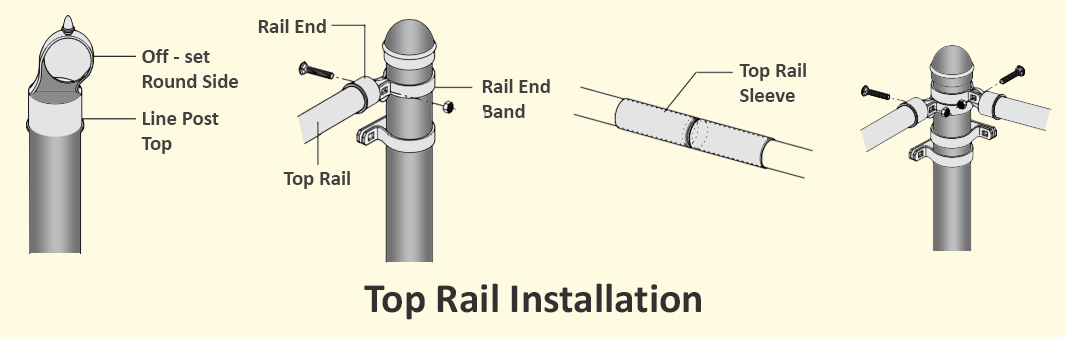
- Place the line post top on the top of each line post. The off-set round side should be on the outer side of the fence.
- Insert one length of the top rail to the top-of-the-line post next to the terminal post. Slip the rail end to the end of the top rail and tie it to the terminal post using the rail end band. Secure by using a carriage bolt with the head on the outer side of the fence.
- Continue by pulling the lengths of the swedge end of the top rail together via the line post tops. (If the swedge end top rail is not used, join the lengths together with the top rail sleeves.)
- Upon reaching the next terminal post, carefully measure and cut the top rail to fit securely between the last length of the top rail and the end of the rail. Fasten rail end band to rail end band on the terminal post by using carriage bolts.
Step 6 – Add Tension Wire if Required
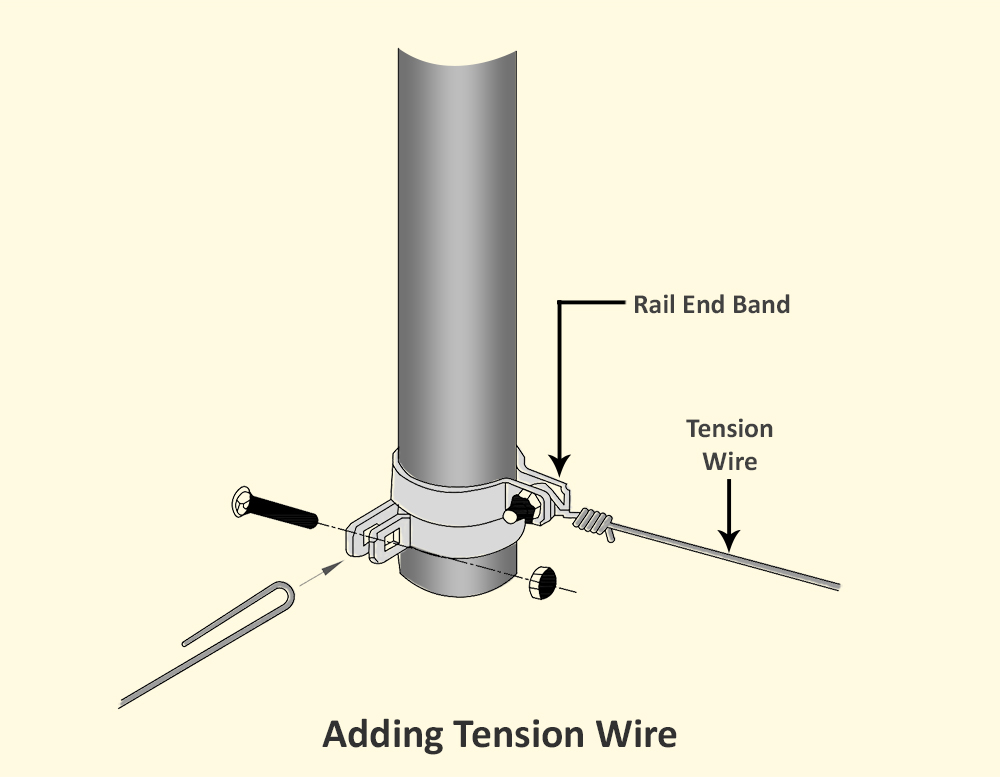
- Wrap tension wire once around bottom rail end band carriage bolt. Using pliers, twist it several times to secure. Tension wire should run along the same side of the posts as the fabric. Apply tension wire clips not more than 24 inches (600mm) apart, or as required for securing the wire to the chain-link fabric.
- Wrap the tension wire once around the bottom rail end band bolt. Using pliers, twist it a few more times to secure. Tension wire is supposed to run along the same side of the posts as the fabric. Later on, apply tension wire clips.
Step 7 – Hanging Fence Fabric
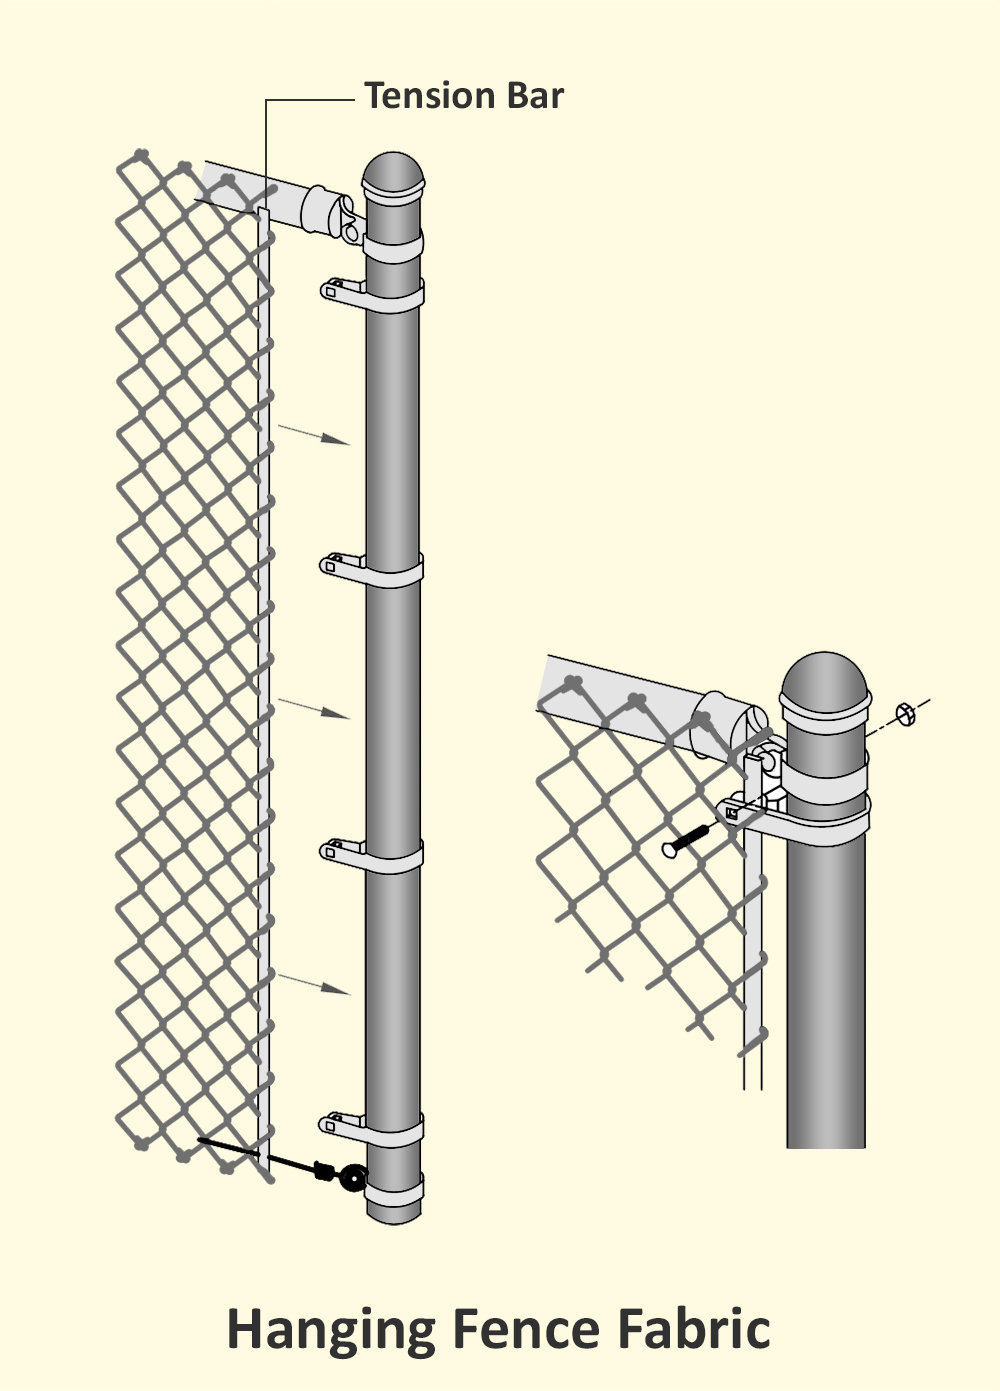
- Starting at the terminal post, unroll the chain-link fabric on the ground along the outer side of the fence to the adjoining terminal post. Slide the tension bar through the first row of chain-linked diamonds. Fasten equally spaced tension bands to the tension bar using carriage bolts with heads on the outer side of the fence.
- Walk along with the fabric, and stand it against the fence frame, take the slack out of your way. Loosely fasten the fabric to the top rail with a few fence ties to hold it in place. Separate enough fabric from the roll to cover the opening between the terminal posts.
- Remove the excess fabric from the pliers by opening the top and bottom loops of a single strand of wire at the desired point of separation. Unroll the strand up through the links until the fabric comes apart.
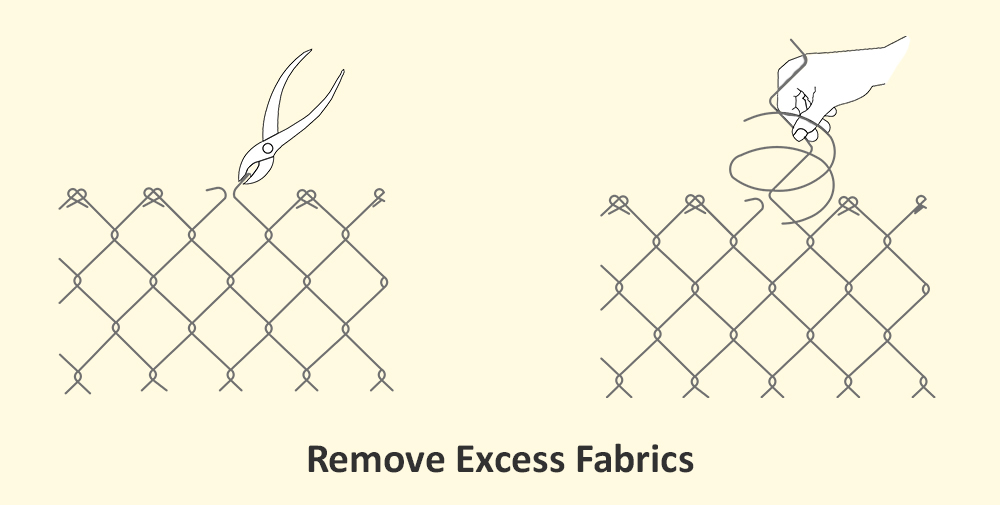
- Splice the sections of chain-link fabric together using a single strand of wire, separated from the end of the fabric. Join the two parts by winding the loose strand down, the corkscrew style through the end ties. Tighten and join the knuckles to the top and bottom to secure.
Step 8 – Stretching Fence Fabric

- Insert a tension bar about 3 feet (90cms) inside the unattached end of the fabric. Securely fasten one end of the fence stretcher to the tension bar and the other end to the terminal post. Stretch out the fabric. Later, remove the temporary tension bar.
- Adjust the fabric to its precise length by inserting or removing the cable. Insert the tension bar at the end of the fabric and connect it to the tension bands on the terminal post.
Step 9 – Installing Fence Ties
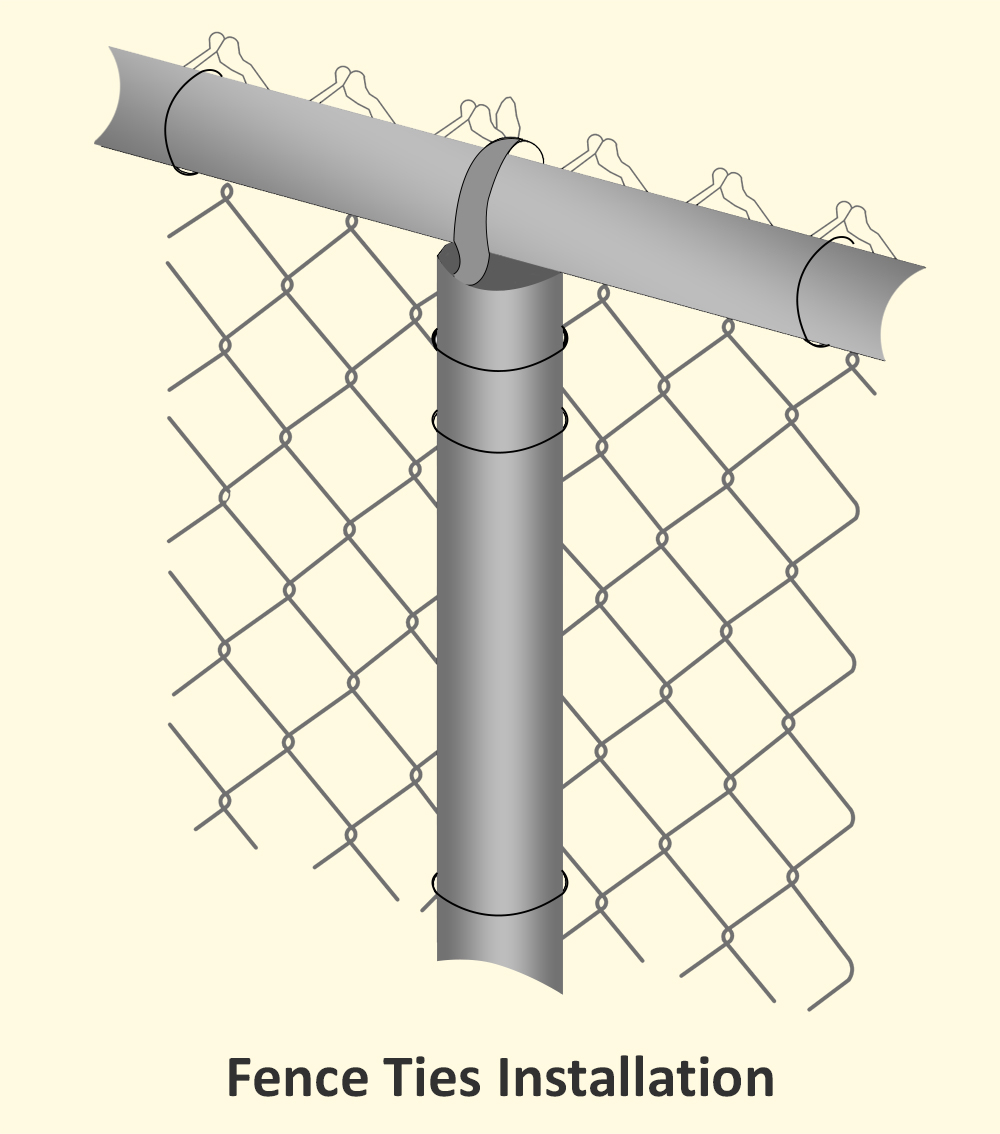
- Securely fasten the fabric with fence ties that are approximately 24 inches (600mm) apart along the top rail and 12 inches (300mm) apart on each line post. In the last, firmly tighten the bolts on all rail end bands and tension bands.
Step 10 – Hanging The Gate
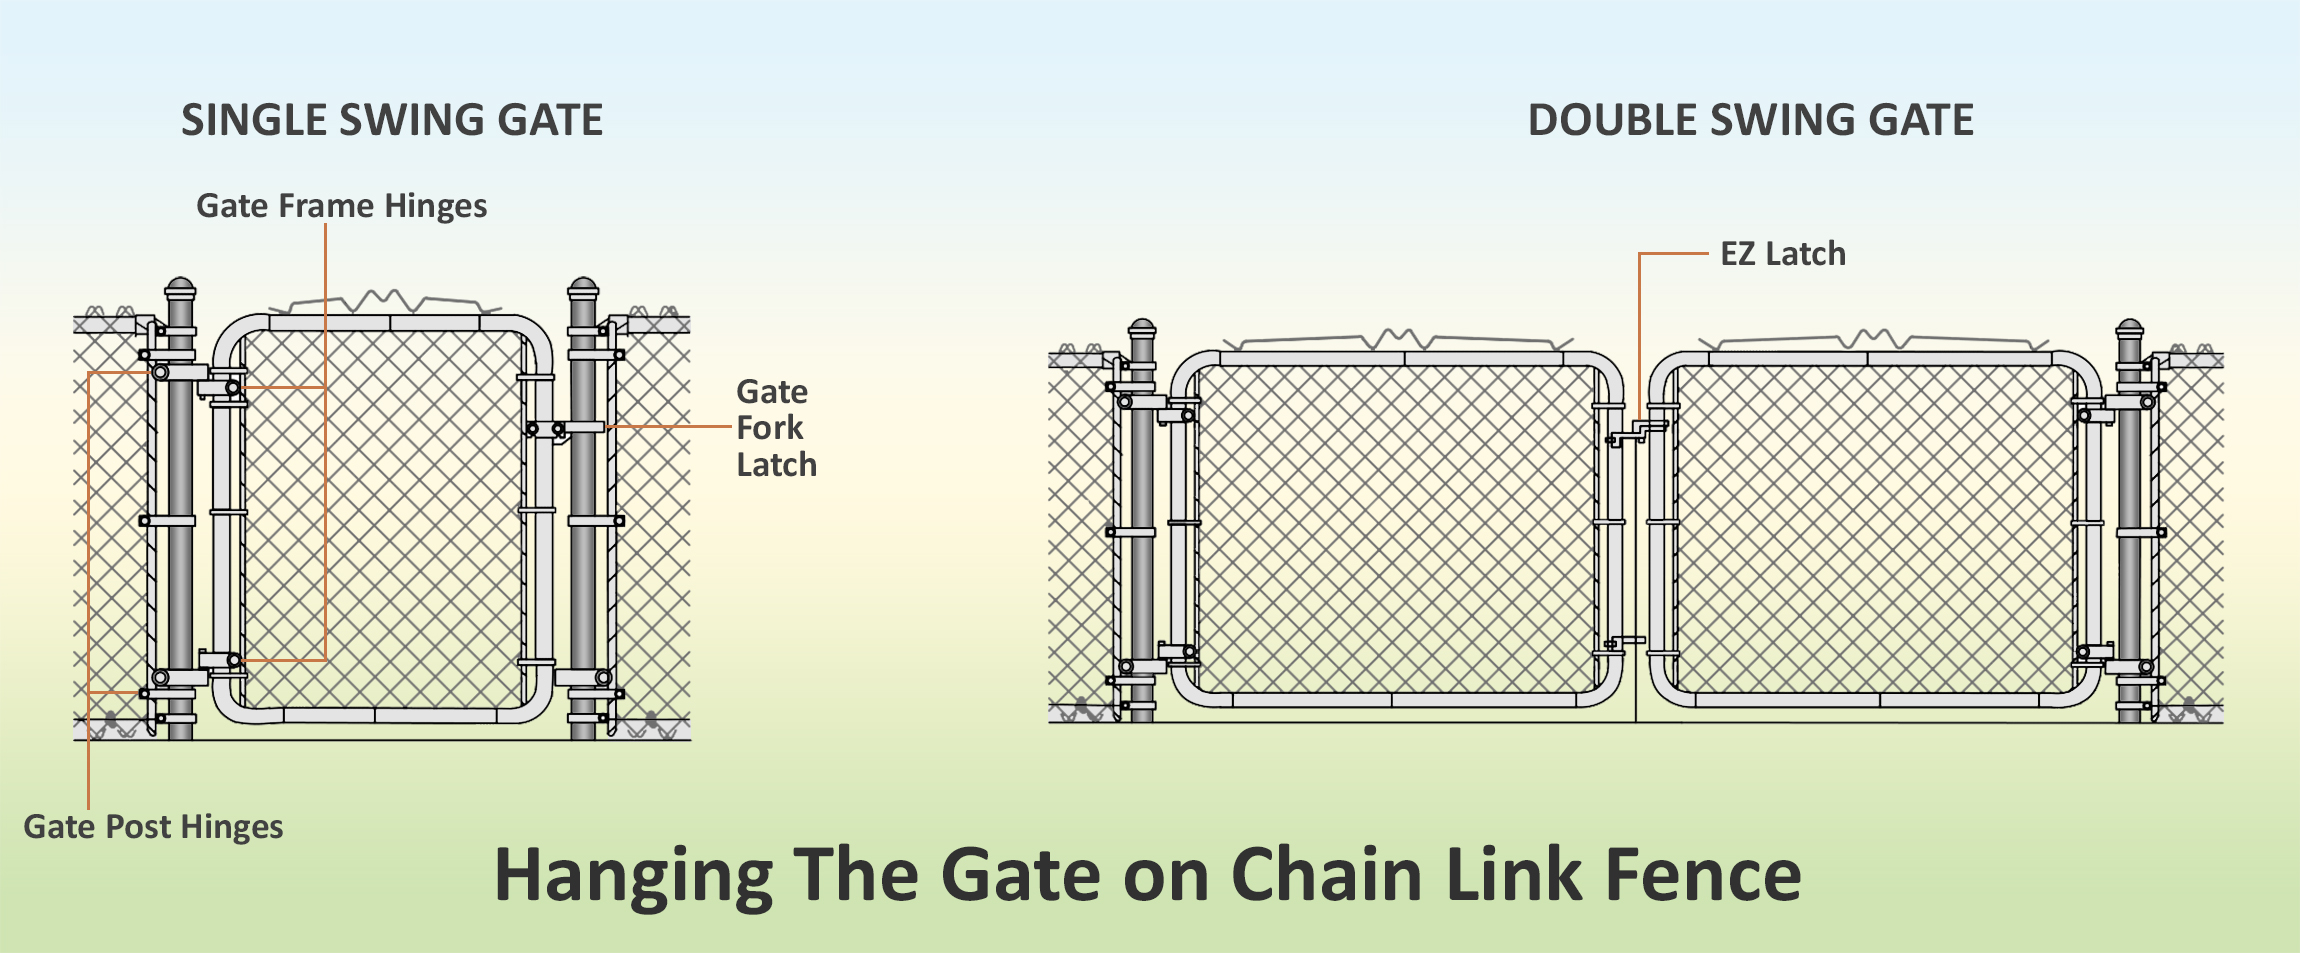
- A similar installation technique is used for both single swing gates and double swing gates.
- Attach the door post hinges to the gate post approximately 8 inches (200mm) from the top and bottom of the gate post with the top hinge pin pointing down and the bottom hinge pin pointing up. Then tighten all bolts.
- Attach the gate frame hinge to the frame of the gate. Loosely fasten the bolts so that they can be easily adjusted to the frame of the gate. Hang the gate in place so that the bottom of the gate has approximately 2 inches (50mm) of ground clearance. First, tighten the bolts on the bottom frame of the hinge, then adjust and fasten the bolts securely to the top.
- Place the gate fork latch at a suitable height and tighten all the bolts securely.
Cost of Chain-link Fence Installation
According to Link Land Fencing System, the following points should be taken into consideration while estimating the cost of installation of chain links fence:
- The total length of fence in linear feet.
- Overall height of the chain-linked fence.
- The number of the end, corner and gate posts.
- The number of doors that you are going to use and their cost.
- The total expenditure or rental charges of tools required for the fence installation.
- Cost of all components and materials that are used for chain-link fence installation.
- Cost of labour. Also, the cost of labour contractor will be added, in case you hire him.
In addition to this, the cost of the fence depends on from where and from whom the chain link fence material has been purchased as the cost varies from place to place. The labour cost of fence installation is also different at different places.
Summing up
Chain-link fencing is normally made of steel. Other materials, such as vinyl and plastic-coated metal products are gradually being introduced in the fencing industry. These coating materials have demonstrated their efficiency in reducing maintenance, upkeep, repair, etc., as well as increase the life cycle. Each material has its own peculiar maintenance issue and problems that could have an impact on the usage and life expectancy of the system.
Some chain link fences are built and designed for temporary use, while others are installed for long-term or permanent use. Installation is critical to the selection of fencing systems and design as there are many installation methods and varieties of fencing materials. The suggested installation methods of the manufacturers must be followed meticulously.
According to ‘Philip Schmidt’[311] (Editor of Book: The Complete Guide to Garden Walls & Fences, Black & Decker), if you are looking for a strong, durable and economical way to keep pets and children in or out of your yard, a chain-link fencing could be the perfect solution. It requires minimal maintenance as well as provides excellent protection.
Hope, this article proves to be of great help in understanding about the chain-link fence. Gharpedia has also written some exciting articles on house fence which we think should interest you. For more detailed information, please click here:
11 Different Types of Fences that are Widely Used Around Your Home
Wood Fencing: An Attractive Option for Your House Boundary – Know More!
Bamboo Fencing: An Alternative Solution of Wood Fencing!
FAQs on Chain Link Fence
1. How Long Does a Chain Link Fencing Last?
A chain link fence lasts around 15 to 25 years. With proper maintenance and rust protection, its lifespan can be extended even longer, depending on weather conditions.
2. Is Chain Link Fencing Good for Security?
Yes, it is strong and durable. It protects property from trespassers and animals. For enhanced security, you may consider use of taller fencing or adding barbed wire on top.
3. Can A Chain-Link Fence Be Painted or Coated?
Yes, it can be painted or vinyl-coated. The fence improves appearance and protects against rust. Standard coatings include black, green, and brown for better aesthetics.
4. How Much Does Chain Link Fence Installation Cost?
The cost depends on height, material, and area. Generally, the cost of installation ranges from ₹200 to ₹600 per foot, and it includes both material and labour charges. Prices may vary by location.
5. Does A Chain Link Fence Provide Privacy?
No, it doesn’t provide complete privacy. However, privacy slats or climbing plants can be added to cover the fence, improving both its look and privacy.
Image Courtesy: Image 1


