Table of Contents
Quick Summary
- The baby quilt block pattern is a trending DIY wall art technique that transforms plain walls into creative masterpieces.
- The pattern mimics a three-dimensional cube created using three diamond shapes in light, mid, and dark tones.
- It offers a unique visual illusion similar to patchwork quilting but applied directly on walls using foam blocks or stencils.
- Ideal for DIY beginners, this project teaches the basics of block print quilts, baby quilt ideas, and simple quilt pattern techniques.
- Materials required include upholstery foam, foam rollers, spray adhesive, photocopies of diamond shapes, paints, and basic marking tools.
- The process involves creating foam stamps, marking the wall with a levelled guide line, and printing each diamond using separate rollers for each tone.
- The baby block design works well as a frieze, door surround, or accent wall element.
- Each print turns out slightly different, giving a mosaic-like, handmade, artistic finish.
- The DIY method is cost-effective and versatile for enhancing home interiors.
Baby Quilt Block Pattern wall decors are creative and can be customised. Hence, walls are the canvas for those with an artistic mind. There’s a lot that one can do with walls! The baby block pattern is a current fad that transforms a drab wall into a creative masterpiece. Gharpedia, through this blog, shares the methodology for baby quilt block patterns.
About Baby Block Pattern

Courtesy - instructables.com
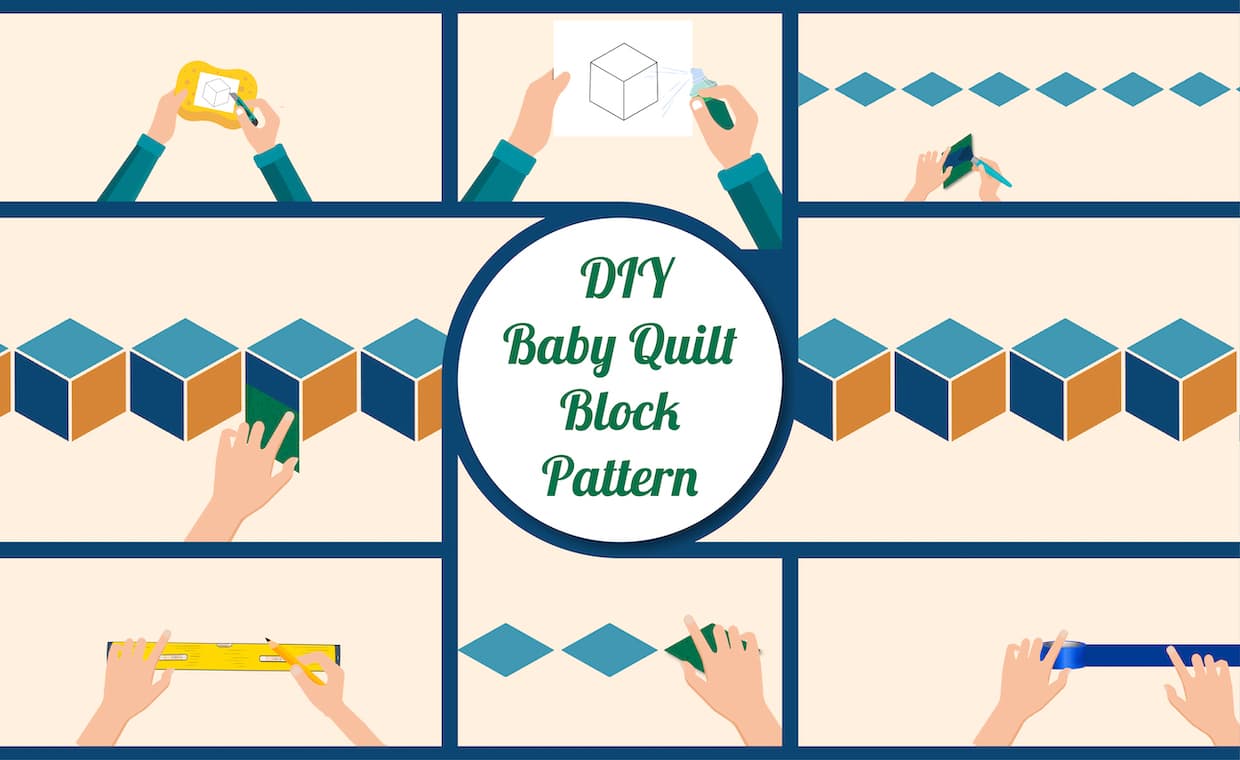
This is a traditional patchwork of baby quilt pattern in which three diamond shapes are fitted together to resemble a cube. The illusion relies on the top diamond being a mid-tone, the left side being light and the right side having a darkened tone. It creates an extremely effective illusion, and a line of these cube shapes makes a good wall frieze or a door surround. The pattern is printed on the wall using diamonds of upholstery foam, but it could also be stencilled if you prefer that kind of effect. The printing method gives the sort of variety seen in a marble mosaic, as each print is different but the three colours remain exactly the same.

Courtesy - thelittleredhen
DIY Quilt Patterns Project
It is an easy quilt block pattern for beginners who want to learn about block print quilt, baby quilt designs, baby quilt ideas and baby quilt patterns. Baby block quilt patterns for beginners are easy for those who want to learn how to quilt.
1. Things Required

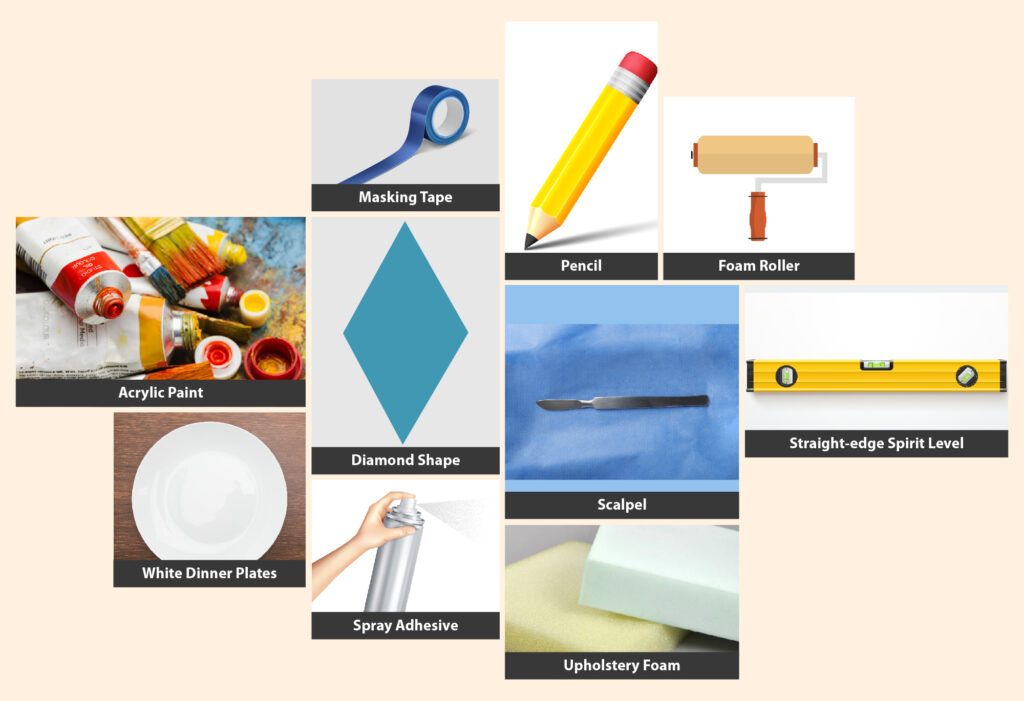
- Upholstery foam
- Three white dinner plates
- Three small foam rollers
- Three photocopies of the diamond shape
- Straight-edge with spirit level
- Spray adhesive
- Scalpel
- Pencil or chalk
- Masking tape
- A light colour; a mid-tone and a dark shadow colour emulsion or acrylic paint
2. Template

Three separate diamond shapes will form a three-dimensional cube, given depth by the use of light, mid and dark tones of colour.
The Step-by-Step Process
Buy an off-cut of upholstery foam to try out this effect.

1. Apply spray adhesive to the photocopies and stick them onto the foam.

2. Carefully cut out the three diamond shapes. Try to cut each side in one continuous line for a neat edge. The full thickness can be cut through afterwards – it is the printing edge that needs to be straight.

3. Measure and mark out the top line position for the frieze.

4. Check with the straight-edged spirit level that the line is straight.

5. Put the mid-tone colour on a plate and run a small roller through it. Coat one of the diamond shapes and print the shapes lengthways with the point on the line.

6. Put the other two colours on plates and use a separate roller for each one. Coat the remaining diamonds with the light and dark tones.

7. Beginning with the dark colour, print a dark diamond below the mid-tone along its lower right edge. Then print the light tone alongside the dark one. Continue to the end.
How about trying out this DIY project over the coming weekend?

Summing Up
Now that you know about the baby quilt block pattern DIY, are you interested in knowing about more DIYs to make your home interiors more beautiful? If yes, then explore Gharpedia further and turn your home into a masterpiece.
10 DIY Interior Decoration Ideas for Your Home That You Must Try
Easy And Unique DIY Floating Shelves For Your House!
FAQs on DIY Project on Baby Block Quilt Pattern
1. What is a Baby Block Quilt Pattern?
A baby block quilt pattern is a design made of three diamond shapes arranged to form a 3D cube effect using light, mid, and dark tones.
2. Can Beginners Try Baby Block Quilt Patterns for Wall Art?
Yes. The method explained is beginner-friendly and requires only simple tools, like foam, rollers, and paint.
3. What Materials Do I Need to Create a Baby Block Pattern on Walls?
You need upholstery foam, spray adhesive, paint in three tones, rollers, photocopied diamond templates, a straight-edge, and masking tape.
4. How do I Get the 3D Cube Effect with the Baby Block Pattern?
Use three tones—light, mid, and dark—and print each diamond using separate foam stamps to create depth and the illusion of a cube.
5. Can The Baby Block Pattern Be Used for Full Walls or Only Borders?
It can be used in either a wall frieze or a door surround, or even as an accent wall for a creative, textured look.
Author & Expert Review
Written By: Huta Raval | Guest Author
| An English Literature and Journalism Topper, Huta Raval has graduated from the L D Arts College, Ahmedabad. Post serving for 23 years in the NBFC and Public Library Sectors her desire for ‘writing the unwritten’ brought her to the creative field of content writing. Her clientele comprises of NGOs, Blogging Platforms, Newspapers, Academic Institutions, et al. |
Verified By Expert:  Ravin Desai – Co Founder – Gharpedia | Co Founder – 1 MNT | Director – SDCPL
This article has been reviewed for technical accuracy by Ravin Desai, Co-Founder of Gharpedia and Director at Sthapati Designers & Consultants Pvt. Ltd. With a B.Tech. in Civil Engineering from VNIT Nagpur and an M.S. in Civil Engineering from Clemson University, USA, and over a decade of international and Indian experience in the construction and design consultancy sector, he ensures all technical content aligns with industry standards and best practices.
Find him on: LinkedIn


