The scope of construction industry is vast and includes materials, tools, equipment apart from methods and processes. Finishing is one of the important processes of the building. Although there are many types of finishes like plastering, whitewashing, colour washing, varnishing, distempering and others, pointing is also commonly used. Pointing can be done for both new buildings and to renovate the old.
According to ‘R. Barry’ (Author of The Constructions of Buildings), the words jointing and pointing are commonly loosely used. Jointing is the operation of finishing off a mortar joint as the brickwork is raised, whereas pointing is the method of filling the joint with a specially selected material for aesthetics or as weather protection to old mortar, or for both.
Here, we are going to discuss about pointing in construction.
What is Pointing?
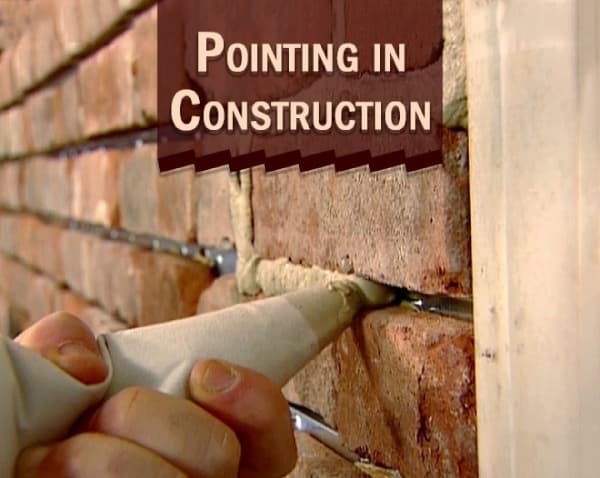
Pointing is the art of finishing the mortar joints in exposed brick masonry or stone masonry with suitable cement or lime mortar, in order to protect the joints from weather effects and to enhance the appearance of building structure. It should be noted that mortar joints are the only weak spots in a structure (structure being made of superior materials) and hence, they should be properly protected from the effects of rain water, sunrays and snowfall. Pointing, being economically feasible, can be adopted in places where rainfall is low.
According to ‘R. Chudley’ (Author of Building Construction Handbook), pointing is the process of removing semi-set mortar to a depth of about 20 mm and replacing it with fresh mortar. It may contain a colouring pigment to further enhance the masonry work.
When Pointing is Done?
It is adopted in the situations,
01. Where it is not required to produce a smooth and even surface.
02. Where the surface appearance is exhibited by the pattern, thickness, colours and texture of joints
03. Where the natural beauty of materials i.e. stone blocks, bricks, etc. is desired to be exhibited in the walls.
04. Where good quality materials like stone blocks, are used in construction which can withstand the adverse effects of weather. Under such conditions, pointing being, an economical alternative, is recommended.
05. Where the workmanship is of good quality and joints can be finished smooth with richer mortar mix.
Mortar for Pointing
Pointing is usually carried out either in lime mortar or in cement mortar. Sometimes, composite mortar is also employed.
- Lime Mortar:
The lime mortar for pointing is made by mixing fat lime and fine sand in proportion of 1:2 in a mortar mill. It is employed in conservation of old buildings and in recreation of new buildings with traditional methods.
- Cement Mortar:

The cement mortar for pointing is made by mixing cement and sand in proportions of 1:3. The materials are mixed in dry condition on a water tight platform. The water is added later. The mortar prepared should be used within 30 minutes after adding water. Generally, the mortar with one bag cement is prepared at a time.
Step by Step Procedure of Pointing
Pointing of mortar joints in exposed brick or stone masonry is carried out as follows
01. All the mortar joints (on the masonry face required to be pointed) are raked out by a special pointing tool to a depth of 15 to 20mm, so as to provide an adequate key for the fresh mortar used for pointing.
02. All the loose mortar and dust are removed using brushes.
03. The joints and the wall surface are washed with clean water, and then kept wet for few hours.
04. The joints so prepared, are filled up with suitable mortar with a small trowel. The mortar in joints is well pressed to form a close contact with the old interior mortar joints. The joints are rendered flush, raised or sunk according to the type of pointing required. The excess mortar on the sides are scraped away.
Pointing may be done either during the work or after the completion work. The former type is stronger and more durable while the latter one is cleaner and better in appearance. It should be noted that though pointing is low-cost, it does not last permanently and it requires frequent replacements from time to time by repointing.
05. The finished pointing work is kept wet for about 3 days when lime mortar is used for pointing and 10 days when cement mortar is used.
Precautions for Pointing Work
01. It should be done while mortar in joints is green and fresh.
02. While pointing an old work, the joints should be well wetted before pointing as the mortar will not stick to a dry surface.
03. The type of mortar as well as pointing should be judiciously chosen depending upon the requirements of job.
04. No pointing work should be carried out during the frost weather as it will result in disintegration of joints due to freezing.
05. The joints of the pointed work (vertical, horizontal or slant) should be clearly depicted with regular line of uniform width. In case of slant joints (as in random rubble masonry), the joint lines should meet at or near the junctions.
Types of Pointing
The joints of pointed work are finished in various shapes. This finishing of pointing work into different types is described below. The choice of the type of pointed finish depends on the type of masonry, nature of building structure and effect of finish desired.

01. Flat or Flush Pointing
In this type, the raked joints are filled up with mortar and finished off flush with the face of the wall. The edges are neatly trimmed with a trowel and the straight edge.
This is simplest type of pointing and is extensively used for finishing masonry work. This type of pointing, though not very good in appearance, is very durable as it does not provide a lodging place for dust, dirt, water etc.

02. Cut or Weathered or Struck Pointing
In this type, the face of the pointing, instead of keeping vertical, is kept sloping outwards. To achieve this, the mortar is first filled up into the raked joint and then top horizontal joints (while still green) is pressed inside by an amount of 3 to 6 mm with pointing tool.

This type of pointing is mostly used for brickwork, particularly for finishing horizontal joints as it immediately throws off the rain water. This has the advantage of not allowing the rain water to get collected in the recess.
03. Recessed Pointing
Here, the face of the pointing is kept vertical and is pressed inside the plane of the wall by means of a suitable tool.
This type is not generally recommended but may be used for facing work for good textured bricks and good quality mortar.

04. Keyed or Grooved or Rubbed Pointing
In this type, the raked joints, whether vertical or horizontal, are first filled up flush with the face of wall, and then a semi-circular notch is formed by a tool known as ‘pointer’. The pointing is known as rubbed pointing as semicircular notch is formed by rubbing the middle of joints by steel tool, i.e. pointer. Grooved pointing has a bigger groove on the face than the keyed pointing.

Grooved pointing gives an attractive appearance to the structure and it is also recommended for superior work, particularly for vertical joints of walls.
05. Tuck Pointing
In this type, the mortar is first pressed in the raked joints and is finished flush with the face of the wall. While the pressed mortar is still green, a narrow channel or groove (having width = 5 mm, and depth = 3 mm) is formed at the centre of the joints. This groove is then filled in (or tucked in, hence, known as tuck pointing) with white lime putty.
Also know the ways to apply wall putty on wall.

This type of pointing can be used for new or old masonry work. Tuck pointing affords a neat and attractive appearance but the fillet part is not durable. Hence, it is adopted for old masonry work.
06. V- Grooved Pointing
There are two types of V-grooved pointing, one is formed by projecting the V-shape of the pointing face outside the wall surface, and the other by pressing the V-shape inside as shown in fig. This pointing is made similar to keyed or grooved pointing except the shape, which is ‘V’ in this case.

07. Beaded Pointing
In this type, the raked joints are first filled up with mortar and finished flush with the face of the wall and then bead is formed by a steel or iron rod with a concave edge in the middle of joint. This type of pointing though having a good appearance, is easily liable to damage.

According to ‘Derek Worthing’ (Author of The Construction of Houses), Pointing is relatively rare in new construction because coloured mortar mixes are now relatively cheaper. However, the Brick Development Association observes that for some joint profiles, it is only practical to form them as pointing – they give the weather struck and cut joint as an example. With pointing, the mortar mix must be slightly weaker than the jointing mortar. If it is stronger, the outer face of the bricks, immediately above and below the pointing, will carry excess load. This can result in the edges of the bricks spalling.
To Sum up, pointing finish gives protective coating to the surfaces which protects and preserves the materials used in building from weather effects such as rain water, frost, heat etc. It also provides decorative finishes or effects which adds to the appearance of the material surfaces and building as a whole. This is mostly used for exposed brick and stone walls. It is not recommended for area with high intensity of rainfall. It is an affordable alternative as it saves cost of plaster as well as paint.


