


Table of Contents
Quick Summary
- Introduction to DIY furniture makeover ideas to transform old household pieces like kitchen shelves, wooden cupboards, tables, and chairs.
- Emphasises cost-effective refurbishing instead of buying new furniture, especially ideal for traditional wooden items and neglected pieces stored in lofts or cellars.
- Kitchen shelves makeover uses sanding, coloured waxes, pigments and wood glue to create a subtle, multicolour sheen.
- Wooden cupboard makeover involves stripping paint, cleaning with sugar soap, applying multi-finish themes (emulsion, dyes, waxes), and fitting new brass hardware.
- Table makeover uses mosaic tile decoration—breaking tiles, adhering pieces, grouting, then varnishing for a decorative tabletop.
- Wooden chair makeover uses layered paint (red + blue), distressed effects, and hand-painted designs to give nursery chairs a personalised touch.
- Each makeover section includes detailed materials required and step-by-step processes to guide homeowners.
- Encourages repurposing old furniture, enhancing home décor while saving money, and exploring more DIY projects for creative home improvement.
Instead of spending your hard-earned money on buying a new piece of furniture, how about investing some time in revamping old furniture? i.e. – kitchen shelves; wooden cupboards; table mosaic decoration and wooden chairs. In this blog, Gharpedia takes you through a detailed step-by-step guide to DIY furniture makeover ideas to let you know how to update old furniture.
Many special decorative finishes are considered unsuitable for large wall surfaces, either because they are messy and difficult to control given the size, or because the result is simply too overpowering. They can be ideal for small projects like tabletops, cupboards and chairs. Bare wood ‘flat-packed’ self-assembly pieces are suitable, as are traditional auction and flea market finds. However, the best of all are those long-forgotten items from yesteryear stored in lofts and cellars. So before you hunt for that expensive new piece to take pride in a new environment, consider what a makeover can do to an old friend. You may be surprised at that furniture facelift.
Old Furniture Makeover Ideas For Your Home
Following are the best old furniture makeover ideas that give a new look to your furniture.
1. Kitchen Shelves Makeover
- Things Required for Kitchen Shelves Makeover
- The Step-By-Step Process for Kitchen Shelves Makeover
2. Wooden Cupboard Makeover
- Things Required for Wooden Cupboard Makeover
- The Step-By-Step Process for Wooden Cupboard Makeover
3. Table Makeover
- Things Required for Mosaic Table Decoration
- The Step-By-Step Process for Mosaic Table Decoration
4. A Wooden Chair Makeover
- Things Required for Old Chair Makeover
- The Step-By-Step Process for Old Chair Makeover
Read on to know more…
01. Kitchen Shelves Makeover

For the kitchen shelves makeover, you can provide subtle waxed finishes to an old self-assembly pine unit – each one should look as if it were reflecting a different coloured light into the room – and sit back and enjoy the improvement on the original polyester finish. It’s one of the best refurbishing furniture ideas.
Things Required for Kitchen Shelves Makeover

- Aluminium oxide sanding block
- Clear wax
- Coloured pigments
- Fine steel wool
- Lint-free polishing cloth
- Screwdriver
- Various abrasive papers
- Wood glue
The Step-By-Step Process for Kitchen Shelves Makeover
- Loosely reassemble the unit and remove the original surface using medium grade, followed by fine grade, wet silicon carbide abrasive paper.
- Remove the finished residue from the dowel holes using an old screwdriver and sand the surface using 240 grit aluminium oxide around a sanding block.
- Rub clear wax mixed with colour pigment into the grain of the wood with fine steel wool
- Using a soft, lint-free cloth, polish the waxed surfaces well to achieve a fine sheen
- Run wood glue into the dowel holes before re-inserting the fluted dowels into the wood
- Glue the different coloured wax shelves to the other half of the dowels
Here are some new kitchen hardware trends if you go for the kitchen shelves makeover. It gives you more ideas for choosing new hardware for your kitchen.

02. Wooden Cupboard Makeover

For wooden furniture facelift, you can use several finishes– paint, colour wash, stain, varnish and wax together with replacement glass and simple brass furniture. It gives a well-made but badly neglected cupboard and drawer combination unit a fresh lease of life. It can also be proved as one of the best bedroom furniture makeover ideas as the bedrooms mostly consist of wooden furniture.
Things Required for Wooden Cupboard Makeover

- Aluminium oxide sanding block
- Brass fittings and screwdriver
- Clear and coloured waxes
- Coloured emulsion
- Gloves
- Liming wax
- Paintbrush
- Paint stripper
- Scraper
- Soft cloth
- Steel wool
- Stubby screwdriver
- Sugar soap
- Water-based dye
- Wood wash
- Varnish
The Step-By-Step Process for Wooden Cupboard Makeover

Go thoroughly below steps for this redoing furniture idea –
- Apply a water-washable paint stripper and then remove the old multi-layered paint finish with a scraper to take off blistered paint. Remember to wear gloves!
- When all the paint is removed, use steel wool dipped in sugar soap to clean the surface thoroughly. Remember to rub in the direction of the wood grain
- Remove the door and clean it; discard the old decor and putty. Distress with a coat of white emulsion
- Opt for orange emulsion from a sample pot for the inside of the cupboard as it needs to reflect a warm, friendly glow
- Paint diluted wood wash (available in small tins) onto the base and top of the unit. Use turquoise here
- Continue with the multi-finish theme – put the diluted ultramarine water-based dye on the side grain, avoiding the front edge
- Let the front remain as bare wood; clean it up with 240 grit aluminium oxide around a sanding block
- Apply and polish blue and white waxes and then test the waxed drawer to ensure that it slides well
- Fit new brass drawer and cupboard door furniture and replace the old plastic knobs. Remember that small hands and a stubby screwdriver are a means to gain access to the inside of the drawers
In case you don’t want to repaint your old and stained wooden cupboard, then you can follow the below-mentioned stain-removing tips for wooden furniture. It will help you to some extent.
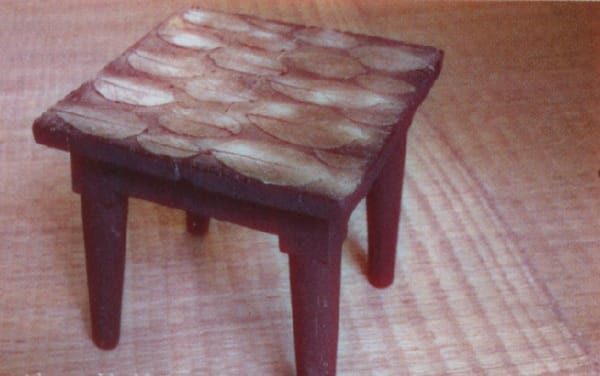
03. Table Makeover

You can opt for mosaic table decoration for your old table makeover. You will not believe how some tile pieces give a new charm to your old table.
Things Required for Mosaic Table Decoration

- Aluminium oxide sanding block
- Brush
- Clear varnish
- Counterpunch
- Emulsion
- Grout
- Grout spreader
- Hammer
- Mitring tools and saw
- Moulding pins
- Rags and cloths
- Ribbed spreader
- Ruler
- T-square
- Tile adhesive
- Tiles
- Yellow pencil
- Wood filler
- Wood glue
The Step-By-Step Process for Mosaic Table Decoration

- Rub the top to remove all sheen traces and provide a ‘key’. Use aluminium oxide around a cork block to rub the surface
- Draw guidelines for the wood pieces using a soft yellow pencil so that they can be clearly seen
- Wrap a cloth around a tile and then break the tile into small pieces using a hammer
- Check the design and sort the tile pieces to see whether there are enough pieces of the right colours
- Glue and pin the wood pieces (following the yellow guidelines) after mitering the wood pieces
- Spread the tile adhesive 3 mm deep with the use of a ribbed spreader
- Carefully position the tile pieces in the adhesive
- After the adhesive has set, grout the spaces between the tile pieces
- Polish the mosaic and paint and varnish the table
We are not done yet with the table makeover; if you want some other decoration for your table, you can follow the below steps for your old table makeover.
04. A Wooden Chair Makeover

A small chair found in the loft, dirty from its travels, could be considered ideal for a child’s nursery. For this wooden chair makeover, a distressed paint scheme would be perfect. The scheme should match the room décor and a hand-painted design on the seat and back support may give the chair its own individual character.
Things Required for Old Chair Makeover

- Abrasive papers such as glasspaper
- Artist’s acrylic paint
- Emulsion paint – Blue, Red, Yellow
- Brushes
- Clear satin varnish
- Fine artist’s brushes
- Pencil and materials for tracing
- Sanding block
- Sugar soap
The Step-By-Step Process for Old Chair Makeover

- Sand down the wood surface using the medium followed by fine glasspaper to give it a smooth finish prior to painting. Clean the chair with sugar soap first so that dirt and grease don’t clog the abrasions and the paint goes on evenly
- Paint the entire chair using the first coat of red emulsion paint
- Paint a second coat of pale blue emulsion over the first coat
- Rub the surface so that the red paint shows through the blue second coat
- Trace the design – which is a bright colourful tree or flowers or cartoons – onto the seat
- Paint the design using artist’s acrylic paints and a number 5 artists’ brush
- Add flowers and leaves using a finer brush and bright acrylic colours
- Finally, brush a protective coat of clear satin varnish onto the chair
If your kids already have their favourite chair, then don’t worry; you can go for another chair makeover idea:
Hope you find these DIY furniture makeover ideas best to modernise your old stuff. It will not only bring back the lost glory of the furniture but will add a great deal of charm to your house.
So, which furniture makeover DIY Project are you taking up this weekend…?
Wait… Wait… Wait… before you take a leave, we also have some interesting home decoration ideas for your sweet home:10 Wall Decoration Ideas with Repurposed Materials!
FAQs on Essential Furniture Makeover Ideas
1. What are the easiest DIY furniture makeover ideas for beginners?
Sanding and repainting, wax finishing, colour washing, and simple mosaic tabletops are the most beginner-friendly makeovers because they require basic materials and minimal tools.
2. How do I restore old wooden furniture at home?
Start by cleaning the surface, removing old finish (sanding or stripping), repairing minor damage, and applying new paint, stain, wax, or varnish, depending on the desired look.
3. What materials are essential for a furniture makeover?
Common essentials include sanding blocks, abrasive papers, paint/varnish, wax, brushes, wood glue, pigments, tile adhesive (for mosaic), and basic tools like screwdrivers and scrapers.
4. Can I redo furniture without sanding?
Yes—chemical paint strippers, bonding primers, or chalk paints allow refinishing without heavy sanding, though light sanding still improves adhesion and finish quality.
5. How long does a typical furniture makeover project take?
Most small pieces (chairs, shelves) can be completed in 3-6 hours, while multi-step projects like cupboards and mosaic tables may take 1-2 days, including drying time.
Author Bio
Huta Raval – An English Literature and Journalism Topper, Huta Raval has graduated from the L D Arts College, Ahmedabad. Post serving for 23 years in the NBFC and Public Library Sectors her desire for ‘writing the unwritten’ brought her to the creative field of content writing. Her clientele comprises of NGOs, Blogging Platforms, Newspapers, Academic Institutions, et al.


