Industrial and generic bathrooms such as those in schools and factories take a real beating from their students or workforce, and higher-end professional businesses such as 4- and 5-star hotels, professional offices, and wedding venues frequently renovate their restrooms to keep up appearances.
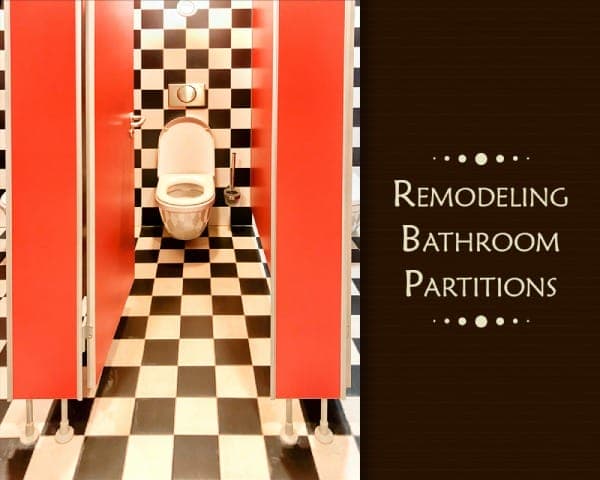
A key part of any bathroom renovation is deciding to upgrade and replace the bathroom partitions. And at $500 to $900 per stall, savvy facility managers don’t make those decisions lightly. After all, a school for example, may have up to 10 stalls to consider replacing per floor of a schoolhouse alone. If you´re already considering bathroom renovations, you can find expert assistance at One Point Partitions, who will guide you through the design, quote, order, and delivery of your new bathroom partitions.
Reasons why Bathroom Partitions Renovation Needed
There are several reasons for bathroom partition renovations may be needed. The first, of course, is a bathroom stall with broken or bent hinges connecting the door panel, or worse, the dreaded lock that is misaligned and no longer works.
People who choose that stall may soon regret it as they try to do their personal business with one hand, and try to hold the door closed with the other.
Not only is it unnerving to be possibly interrupted by a stranger but, in general, it’s also unsanitary.
And then there’s the graffiti. Some restroom stalls in schools, gas stations, bars, and industrial sites tend to resemble a war zone. Obscene language and drawings, made with a magic marker or carved into the door itself, completely ruins the decor of a bathroom.
And, of course, nobody expects to go into a 4-star or 5-star hotel or professional building, where the lobby is decorated with artwork and waterfalls, and then duck into a restroom and have a 2-star experience. Demanding customers expect more.
Deciding Whether New Bathroom Partitions Should be Installed?
No facilities manager really needs to be told when to replace bathroom partitions. Their janitorial staff will tell them when it’s time. In schools, plan on replacing once every year or two. In high-end businesses, an entire restroom is frequently renovated as the cost of doing business.
Where to Purchase New Bathroom Partitions?
Facilities managers in larger towns may have a local plumbing and hardware warehouse, which means you can walk in and walk out today with the hardware you need.
But for larger projects, you’ll want to look online for one of the typical distributors of bathroom stall partitions.
Which Type of Partition Should You Go With?
There are four general types of partitions for bathroom:
01. Generic, Powder-Coated Bathroom Partitions

These are the cheapest. In a school, gas station, or factory, the vast majority of facility managers tend to go with powder-coat partitions. Made of baked steel with a cardboard underpinning, the finish is uniform and long-lasting, provided it’s taken care of.
This means that the janitorial staff must not use strong chemicals that can degrade the finish, and ensuring that, of course, the partition is not ruined with graffiti.
Unfortunately, powder-coats are easily scratched with a knife, dented with fists or feet, and easily ruined by a magic marker and spray paint. Count on repainting frequently at a minimum.
02. Laminated Steel Bathroom Partitions

This allows for multiple patterns and colours. Laminated steel, which is a metal steel plate coated by a plastic and particle board laminate, is a great choice because it comes in many patterns and colours, making an otherwise cheap restroom seem high-end for around 5 percent more than powder-coating.
The problem with laminate is that it degrades when exposed to water. This means a facility manager would not choose laminate in parts of the country that are humid such as Florida, Southern Texas, Mississippi, and Georgia, for example.
And even if a business is located in a bone-dry state like Arizona, if there is a shower or a swimming pool nearby, such as an exercise room or a gymnasium, you can forget about laminate.
03. Solid HDPE Plastic Bathroom Partitions

This allows for both multi-colored partitions and work in every environmental location (places that laminate does not allow). Solid HDPE plastic partitions are significantly cheaper than high-end stainless steel and come in many colours. In addition, if you want to transform an ordinary plastic door into a high-end one, you can easily do so by attaching wallpapers or even ceramic tiles to the plastic. If you have a graffiti problem, remove the wallpaper from the portion of the partition affected, and then reapply fresh wallpaper.
All in all, solid plastic is generally the way to go for all but the most industrial of sites such as schools. The price is typically around 50 percent more than powder-coating, but solid plastic doors will hold up for up to 15 years.
04. Stainless Steel Bathroom Partitions

This is often the best for high-end facilities, although it does tend to be costly. This can be the choice for really high-end locations that are generally not worried about any type of graffiti problem.
Stainless steel, particularly with built-in patterns such as diamonds, looks very beautiful, will hold up for years, and they are easy to clean as well. The only main drawback is their cost, which is up to twice the cost of the alternatives.
Ultimately, the vast majority of facilities managers wind up choosing either solid plastic restroom partitions or stainless steel.
Besides bathroom partitions, we have also written article on different types of wall partition. So, you may read,
How to Install Bathroom Partitions?
It’s not exactly rocket science to install bathroom partitions. But if you’ve never done it or don’t have maintenance staff to put them together, consider hiring a local contractor to do it for you. And even if you have maintenance staff, consider hiring a contractor and have your maintenance staff observe.
However, if you want to do it on your own, take note of the following steps:
01. Using chalk, create a front centerline to make sure you stay on the designed layout.
02. Drill holes ⅞” in from the edge of the pilaster locations after you’ve established the floor bracket location.
03. Fasten two panel brackets to the wall using your centerline location.
04. Put up the wall pilasters.
05. Fasten the upper and lower hinges to the wall pilaster.
06. Fasten the U brackets to the pilaster.
07. Install the floor shoes.
08. Hang the doors.
09. Fasten the headrail.
10. Fasten all the screws and hardware.
You may also watch video on how to install bathroom partitions:
In the end, this is, of course, a trimmed-down set of instructions, but fortunately, most hardware companies provide detailed instructions and also videos. There are also videos on YouTube for how to install bathroom partitions.
You may also refer other articles related bathroom and its renovation. Refer following blogs:
How to Know It is Time for a Bathroom Renovation?
10 Inexpensive Tips to Get a Statement Bathroom!


