
Table of Contents
Plastering the interior and exterior walls of your home is an important task as it renders a perfect finish to the wall surface and adds strength to them. A coat of plaster can conceal uneven surfaces, making your walls look even, smooth, clean. Plastering also provides a satisfactory base for painting, distempering, white washing, or colour washing. It protects the walls from rain and other environmental factors that could damage the structure.
The plastic material or mortar used in the process is essentially a mixture of various building materials such as cement, lime, gypsum, fine aggregates (sand), and water. Nowadays, cement plaster is mostly used in plastering the walls of a house. In this article, you will find brief information pertaining to cement plaster.
What is Cement Plaster?
Cement plaster is a homogenous mixture of Portland cement, fine aggregates, and water. Generally, OPC 43 and OPC 53-grade cement is mixed with sand (the fine aggregate) in different proportions; hence, this plaster is also called as the cement-sand plaster. PPC cement is preferred in place of OPC-grade cement for plastering. Because there are many advantages of PPC cement over OPC cement.
The number of plaster coats applied varies according to the requirement. For inner walls, a single coat of plaster is generally sufficient to achieve the desired finish. If the thickness of the plaster is more than 15 mm or when you need a finer finish, two coats of plaster are required. If the surface to be plastered is very uneven, three coats of plaster are applied where the first coat, scratch or dash coat, is applied for a smooth finish. Next, the base coat is applied, followed by the finish coat. For external wall, two coats of plaster are required and thickness of plaster is 12 to 18 mm.
Know, Why External Plaster is Done in Two Coats?
Required Thickness of the Cement Plaster
The thickness of cement plaster depends upon its composition and the surface to be plastered.
- A minimum plaster thickness of 10 mm should be maintained for a satisfactory smooth surface on concrete walls.
- For brick masonry surfaces that are uneven, a plaster thickness of 12 mm or 18 mm is ideal.
- Any other surface that’s superlatively uneven demands a thickness of 20 mm.
Refer below plaster thickness recommendations before undertaking a home plastering project.
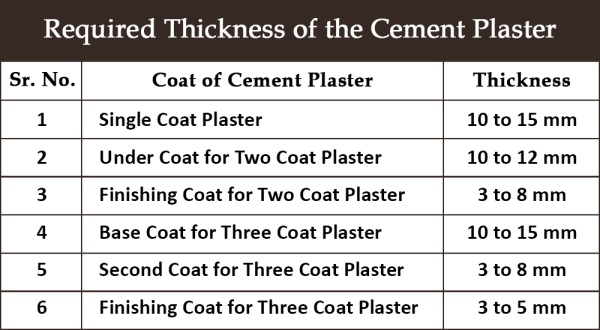
The finishing coat should be of such minimum thickness so as to provide a sufficient body of material to satisfactorily harden under the site conditions. Ideally, the total thickness of a two-coat plaster should not exceed 20 mm. Also, the thickness of a three-coat plaster should exceed 25 mm. In general, a 20 mm plaster is used on the outer walls, a 15 mm plaster on the inner walls, and a 10 mm plaster on the ceilings.
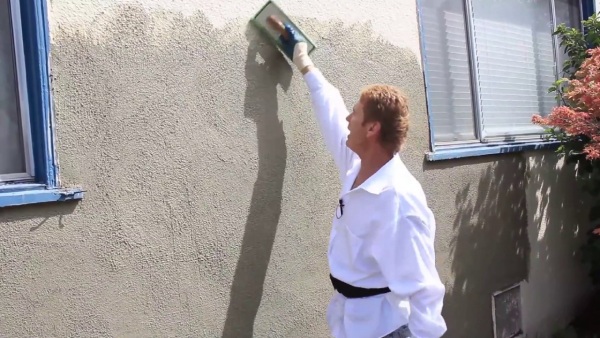
Plastering on Exterior Wall
Grading of Sand for the Cement Plaster
The sand used for making the plaster should be clean, sharp, suitably-graded, and free from impurities. By Indian Standard, the most suitable particle-size grading of sand for this plaster is given below:
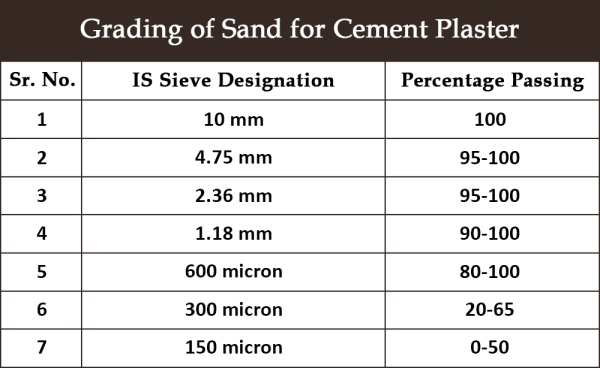
- For the final and base coat, the sand should be 100 percent passing a 2.36 mm sieve and not more than 5 percent passing a 150-micron sieve.
- For the finishing coat, the maximum size should be restricted to that passing a 1.18 mm sieve.
The required grading adjustment is often done by screening and/or by blending together either natural or crushed sand.

As discussed earlier, different proportions of cement and sand are used to obtain a homogeneous plaster mix. The following factors are considered when determining the proportion:
- The environmental conditions affecting the wall or ceiling.
- The type and grade of cement.
- The type and grading of sand.
- Location of plastering – whether it’s an interior or exterior wall.
Here are a few proportion recommendations according to the Indian Standards:
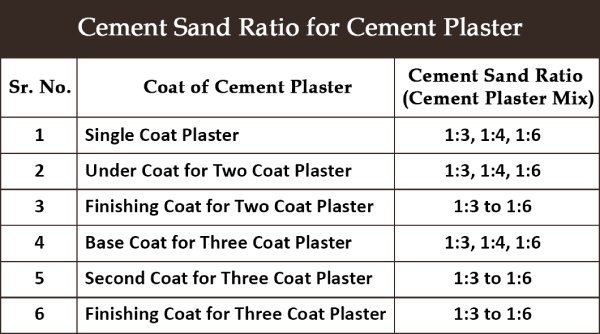
The proportion mix for the finishing coat depends on the texture and colour of the wall surface desired. Once the proportion is determined, the ingredients should ideally be mixed in a cement mortar mixer. First, the dry mortar is mixed and then water is added to obtain the desired consistency.

Cement Mortar Mixer
For making the plaster mix, potable water is the most suitable. This water should be free from chlorides and organic impurities, namely silt, oils, alkalis, acids, and salts. All these impurities are proven to weaken the mix.
The quantity of water should be equal to 28% by weight of cement plus 4% by weight of all the aggregates for maximum strength. The materials should be saturated, nonabsorbent, surface dry so that the mix is workable and gives maximum strength.
The amount of water used for the plasterwork with 1:3 proportions is about 70 percent of the weight of cement. The quantity of water may vary depending on the following factors:
- The condition and nature of the fine aggregate;
- The temperature and humidity at the time of plastering;
- The richness of the mix – whether it’s richer or leaner than 1:3;
- The varying quantities of lime in the composite mortars;
- The admixtures added for improving the workability.
For regular residential plasterwork, the quantity of water is taken as 20% of the total weight of cement and aggregates. However, for better results, the quantity of water should be worked out depending upon the cement content mix and thickness of the plaster.
Once the mix is ready, you can either apply it manually or use a cement plastering machine for a good finish. Manual plastering is ideal for working in small areas while automated or semi-automated machines can be used for larger homes and offices.
Know, the Basic Guide for Preparation of Internal Plaster
Curing of the Plaster
Curing of cement plaster is a necessary step as it helps in reducing the surface cracking and adds strength to the wall. Curing of cement plaster should be done 24 hours after the plastering work. The plastered surface should be kept wet for a period of 7 days. Also, there should be a gap of 7 days between the first and the second coat. Each coat should be kept damp continuously for a minimum of 5 days. Finally, make sure that the base coat is evenly dampened before applying the next coat.
In cold weather conditions, longer curing periods are necessary. In weather conditions that are hot/warm, less humid, or windy, the curing process should start as soon as the cement mortar shows evidence of setting.
Summing up, plastering the walls of your abode can make them look attractive, thereby accentuating the curb appeal of your property and adding aesthetic value to it. After all, it’s important to make a good first impression on all those who visit you!
Also Read:
Basic Guide for the Preparation of External Plaster!
Reasons behind Cracks in Plaster: An Incredibly Easy Guide
Cement Plaster VS Gypsum Plaster
Image Courtesy: Image 3


